...
1. Turn on your Mac laptop. |
|
2. Turn on the projector via the touch panel or remote control, depending on what is available in the room. |
|
3. Press the laptop button on the touch panel or use the remote control to select the source on the projector for the laptop. |
|
4. Plug in the VGA adapter to your laptop. (This adapter is required to connect with most standard projection systems, and may be sold separately from your laptop. |
|
5. Plug the VGA cable from the projection system to your adapter. |
|
6. On your laptop, open the "System Preferences" dialogue box. |
|
7. Click "Displays". |
|
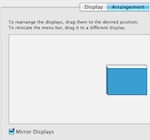
8. Click "Arrangement". If the box for "Mirror Displays" is unchecked, check it. | |
9. Click "Display". |
|
10. In the Resolutions window, select "1024x768" and for Refresh Rate select 670 60 Hertz. | |
11. Both the laptop and projector should now display the same image. Run whatever application you want to project as normal. |
|

...