| Warning |
|---|
The following formatting instructions identify specific requirements for papers submitted for the Drew DMIN program. Please consult your advisor for the Please consult your school or reading committee for the specific formatting requirements that apply to your paper and adjust the following directions where needed. These instructions are also were written using Word 2013. If you use a different version of Word - especially a version of Word 2011 for Mac - your options may be found in a different place, though they will almost always go by the same name. Visit support.office.com to learn more about any setting you cannot find. |
Paragraph marks can be helpful to see when something is not responding to formatting the way you expect it to. These can be turned on and off by clicking the paragraph marks symbol,  , in the Paragraph group on the Home tab of the ribbon. , in the Paragraph group on the Home tab of the ribbon. Text| Expand |
|---|
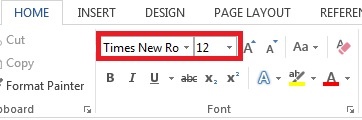
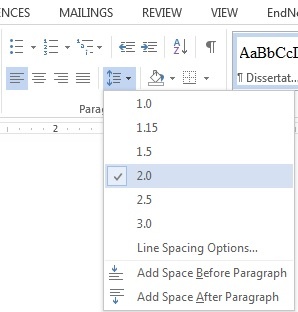
Your entire document has the same font, so apply these settings before you write. If using a Drew Dissertation template, these formats are applied using the "Dissertation" style. | Your text should be set to Times New Roman, size 12. | | Spacing should be double (2.0). (Special sections of text, like footnotes or block quotes, will be single spaced. See those sections for more information.) | |
|
Page Margins| Expand |
|---|
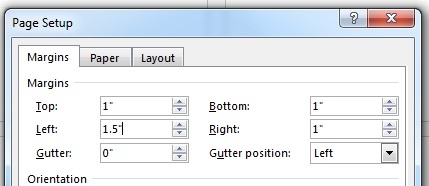
Your entire document should have the same page margins, so set the page margins before you write. | Go to Page Layout > Margins > Custom margins…. | | | Set the margins as follows: 1” margins top, bottom, right; 1.5” left | |
|
Title Page| Expand |
|---|
If using a Drew Dissertation template, these formats are applied using the "Title for Title Page" and "Dissertation" styles. Click the Center alignment button Click the Center alignment button in the Paragraph group on the Home tab of the ribbon  Type out your title, entirely caps (tip: use Caps Lock) Type the other information, matching the sample provided to you (not all caps) Right click on first line of title Choose "Paragraph…." from the menu Make sure "Special" is set to "(none)" Set "Line spacing, Before" to 108 pt . (This creates for a 2.5” space at the top of the page), or (for CSGS papers) set to 72 pt for a 2" space 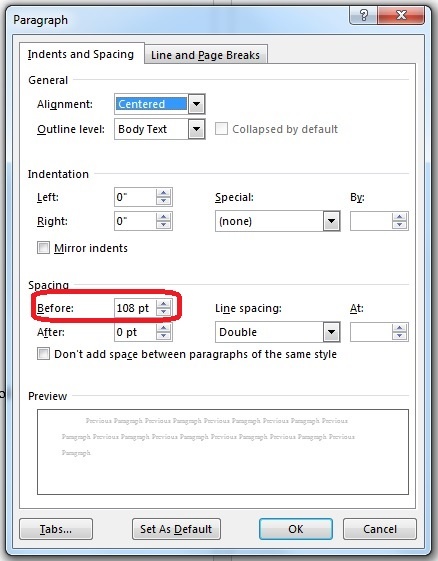
Click OK
Add blank space spaces between each section of text by hitting Enter until your date is at the bottom - Hit Delete or Backspace once if the date goes on to the next page
|
Body Paragraphs| Expand |
|---|
If using a Drew Dissertation template, this format is applied using the "Dissertation" style.
Type out your first sentence (even if you plan to change it later!) Right click on the sentence and select "Paragraph…." from the menu. Set "Special" to "First Line" It should default to 0.5”, but set it to that if not 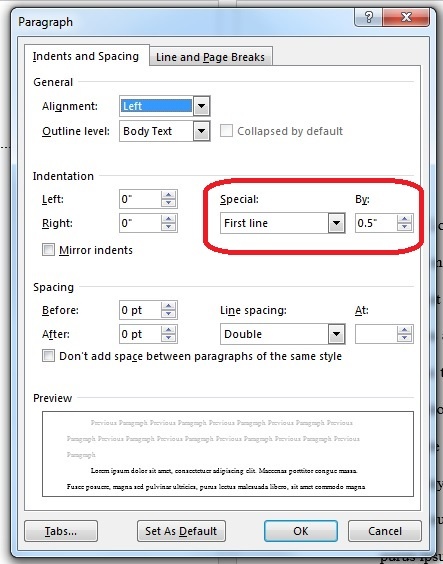
- Click OK
|
| Expand |
|---|
The most important thing to remember with your chapter titles is CONSISTENCY. The Theological school requires the following settings, but the CSGS does not. Confirm Remember to confirm your requirements with your dissertation school and committee. If using a Drew Dissertation template, these formats are applied using the "Chapter Title" and "Title Not for TOC" styles.
Chapter titles should be in all caps, centered If naming chapters "CHAPTER 1: CHAPTER TITLE", type CHAPTER 1, hit Enter, then type CHAPTER TITLE 2” from top of page: Right click on (first line of) chapter title and select "Paragraph…." from the menu "Special" should be set to "(none)" Spacing > "Before:" should be set to 72 pt (to begin the title 2" from the top of the page) Select the "Don't add space between paragraphs of the same style" checkbox 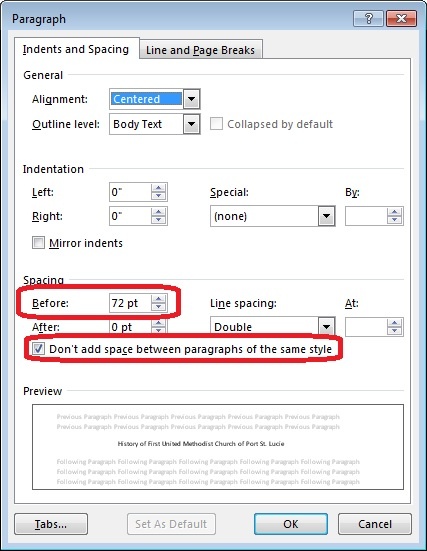 Image Removed Image Removed
If it doesn’t look like your title moved, turn on paragraph marks and make sure there is a section break at the end of the chapter before
|
| Expand |
|---|
For quotes longer than 3 typed lines or 50 words (check your guidelines for clarification), the quote should be set apart as a block quote. To do this: - Make your quote its own paragraph by hitting Enter before and after the quote
- Right click anywhere in the paragraph and select "Paragraph…." from the menu
- Set the Left Indentation to 0.5"
- Make sure Special is set to (none)
- Set the Line spacing to Single
 Image Removed Image Removed
- Click OK.
|
| Expand |
|---|
Some guidelines suggest a 3-em dash be used in the bibliography/works cited in place of repeating an author's name. To insert a 3-em dash: - Put your cursor where you need the line.
- Go to the Insert tab.
- Click on Symbol (to the right) and choose More Symbols.
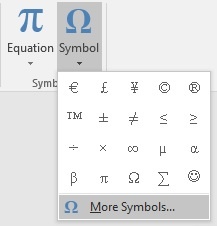 Image Removed Image Removed
- Click on Special Characters at the top.
- The first character is usually the em dash, which is what we want. Click Insert 3 times (slowly - if you go too fast, it won't insert 3).
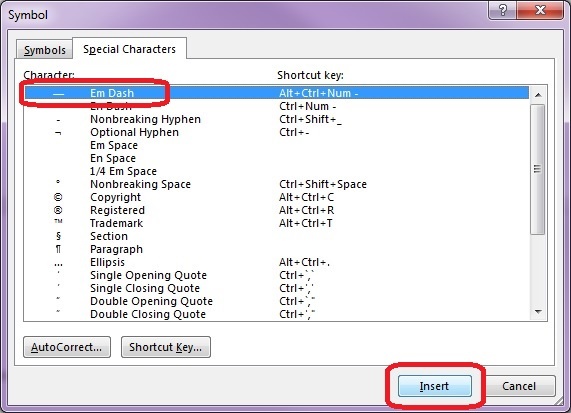 Image Removed Image Removed
- Click Close, then type your period, space, and the rest of your reference.
|
Adding Section Breaks (for page numbering and footnotes)| Expand |
|---|
If using a Drew Dissertation template, this format is applied using the "Block Quote" style. For quotes longer than 3 typed lines or 50 words (check your guidelines for clarification), the quote should be set apart as a block quote. To do this: - Make your quote its own paragraph by hitting Enter before and after the quote
- Right click anywhere in the paragraph and select "Paragraph…." from the menu
- Set the Left Indentation to 0.5"
- Make sure Special is set to (none)
- Set the Line spacing to Single
Image Added
- Click OK.
|
| Expand |
|---|
Some guidelines suggest a 3-em dash be used in the bibliography/works cited in place of repeating an author's name. To insert a 3-em dash: - Put your cursor where you need the line.
- Go to the Insert tab (or Insert menu on Mac).
- Click on Symbol and choose More Symbols (the option is called Advanced Symbol on Mac).
Image Added
- Click on Special Characters at the top.
- The first character is usually the em dash, which is what we want. Click Insert 3 times (slowly - if you go too fast, it won't insert 3).
Image Added
- Click Close, then type your period, space, and the rest of your reference.
|
Adding Section Breaks (for page numbering and footnotes)| Expand |
|---|
Create sections to handle page numbering and restarting footnote numbers at 1 in each chapter. | | Expand |
|---|
Create sections to handle page numbering and restarting footnote numbers at 1 in each chapter. - The title page and any un-numbered pages in the front matter should be a one section
- The Table of Contents and any numbered pages in the front matter should be a one section
- Each chapter should be its own section
- If listed separately in your Table of Contents, each appendix should be its own section
- If you only list "Appendices", then all appendices should be one section
- The Bibliography should be its own section
- Those including a Vita should make that page a different section
To add a section break at the end of a section: Put your cursor after the text in the section beforeas close to the bottom of the last page in your section as possible On the Page Layout tab, select Breaks > Next Page (under Section Breaks) 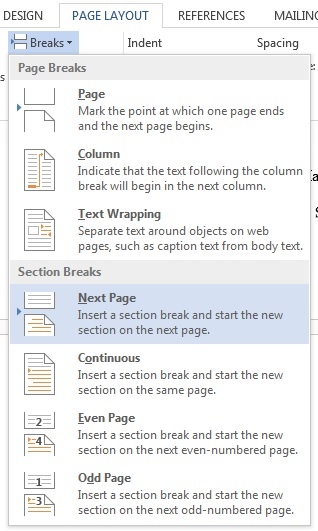
Please avoid the Continuous section break. On Mac, this option can also be found in the Insert menu > Break > Section Break (Next Page)
If you get an extra line before the next page’s title, hit (forward) Deleteyou can delete it - Word will remember the formatting you create in a section for page numbers and footnotes, so you can set up the formatting for the first few sections, then add sections for additional chapters as you write without needing to manually adjust the page number and footnote settings in each chapter
NOTE: You will only know that a section break exists if you (a) turn on paragraph formatting marks or (b) take note of the section numbers when in your header/footer area. |
| Expand |
|---|
Put cursor where footnote number should be On the References tab, choose "Insert Footnote" 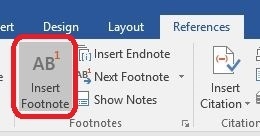 Image Added Image Added
If using a Drew Dissertation template, this format is applied using the "Footnote Text" style, which applies automatically when following the steps above to insert a footnote. | | Expand |
|---|
First, change your view. On the View tab, select Draft.
Put cursor where footnote number should be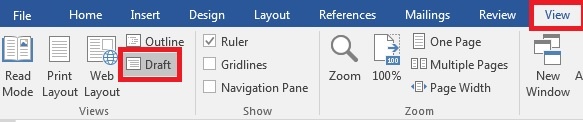 Image Added Image Added
On the References tab, choose "Insert Footnote" 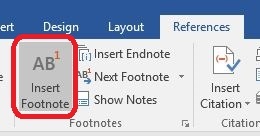 Image Removed Image Removed
First, change your view. On the View tab, select Draft. Image Removed
On the References tab, choose Show Notes.  Image Removed Image Removed
At the bottom, make sure the drop down says "All Footnotes". Click in a footnote and then hit Ctrl+A on your keyboard to select all. Right click in highlighted text and select "Paragraph…." from the menu Adjust the following settings: Alighnment: Left Indentation, Left and Right: 0” Indentation, Special: First Line, 0.5” Spacing, Before: 0 pt Spacing, After: 12 pt Line spacing: Single 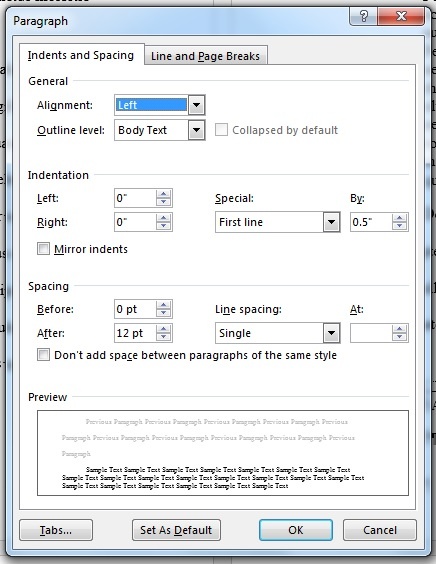 Image Removed Image Removed
Click OK To return to your usual view, go back to the View tab and choose Print Layout.
Please note: For the DMin program, footnotes must restart at 1 in each chapter. For students in the Graduate School, check with the readers on your committee about whether the numbers need to start at 1 again, or should be sequential throughout your paper. Right click on a footnote and select “Note options” In Numbering, select “Restart each section” In Apply changes to, select “Whole Document” - Click Apply.
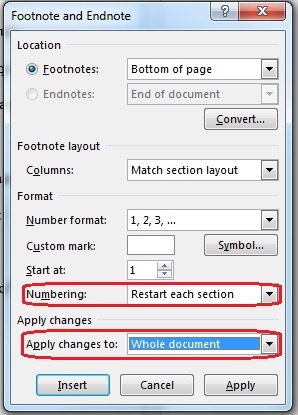 Image Removed Image Removed
|
Page NumberingYou will find step by step instructions for page numbering atNumbering Your Pages.Show Notes. Image Added
At the bottom, make sure the drop down says "All Footnotes". Click in a footnote and then hit Ctrl+A on your keyboard to select all. Right click in highlighted text and select "Paragraph…." from the menu Adjust the following settings: Alighnment: Left Indentation, Left and Right: 0” Indentation, Special: First Line, 0.5” Spacing, Before: 0 pt Spacing, After: 12 pt Line spacing: Single Image Added
Click OK To return to your usual view, go back to the View tab and choose Print Layout.
Right click on a footnote and select “Note options” On Mac, you can also go to the Insert menu > Footnote... to open this Footnote and Endnote dialog box
In Numbering, select “Restart each section” In Apply changes to, select “Whole Document” - Click Apply.
Image Added
|
Page NumberingYou will find step by step instructions for page numbering atNumbering Your Pages. If you are including images in your paper, you can read how to add captions in Word in this article (applies to Word 2007, 2010, 2013, and 2016). This YouTube video from Office gives you some tips for including images in your Word document: https://www.youtube.com/watch?v=pPlBSv5C83M Table of Contents| Expand |
|---|
Save the Table of Contents (TOC) for last, as you should have your paper mostly written before completing your TOC. If using a Drew Dissertation template, an automatic TOC is included which is built using text with the "Chapter Title" style applied. The template also has a "Dots for Table of Contents" style to apply to manually built TOCs and lists of figures or tables |
If you are including images in your paper, you can read how to add captions in Word in this article (applies to Word 2007, 2010, 2013, and 2016). This YouTube video from Office gives you some tips for including images in your Word document: https://www.youtube.com/watch?v=pPlBSv5C83M Table of Contents| Expand |
|---|
Save the Table of Contents (TOC) for last, as you should have your paper mostly written before completing your TOC. Make sure your TOC chapter titles match the titles in your text. Dot leaders are the dots between your chapter title and the page number that chapter starts on. The page numbers will be flush right after adjusting these settings.
Type all of the chapter titles, hitting Enter after each one per line Highlight all of the titles Right click and select “Paragraph….” On Mac, you can also open the Paragraph dialog box from the Format menu > Paragraph...
Choose Tabs… 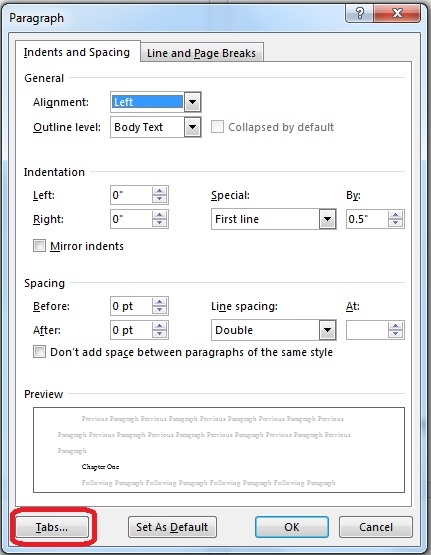
In “Tab stop position” ("Tab stops:" on Mac), type 6” Set the Alignment Right Choose Leader 2 (the dots) Click Set, then OK 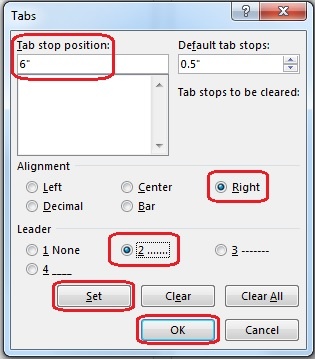
Put your cursor at the end of the first title and hit the Tab on your keyboard Dots will be inserted all the way to the right margin. Type your page number here. Repeat the Tab and page number for each title
|
|