Versions Compared

Key

  • This line was added.
  • This line was removed.
  • Formatting was changed.

...

1. From the Go menu in the Finder, select Connect to Server.

2.  Enter one of the following in the "Server Address:" box:

For AFP access:

afp://causeway2-u.drew.edu/Causeway2 Users/yourusername  (for what is the F: drive in Windows)
afp://causeway2-o.drew.edu/Causeway2 Depts/yourdeptname  (for the G: drive for administrative offices)
afp://causeway2-p.drew.edu/Causeway2 Progs/yourdeptsname (for the G: drive for academic programs, departments and centers)
afp://causeway2-t.drew.edu/Causeway2 Courses/currentterm  (for the K: drive)

e.g. afp://causeway2-u.drew.edu/Causeway2 Users/sashley1
e.g. afp://causeway2-t.drew.edu/Causeway2 Courses/fa2011

For CIFS (SMB) access:

cifs://causeway2-u.drew.edu/users/yourusername
cifs://causeway2-o.drew.edu/depts/yourdeptname
cifs://causeway2-p.drew.edu/progs/yourdeptsname
cifs://causeway2-t.drew.edu/courses/currentterm

Then click the Connect button

Info

AFP or CIFS?
You can connect to network drives using either AFP or CIFS.  AFP is the native Apple protocol, and CIFS is the Microsoft Windows networking protocol.  Which you use is up to you, but there may be times when one is not working, in which case you should try the other.   CNS may also send out updates about what protocol is best to use at any given time.


Warning
title"Problems with Lion"


At this time, there are issues accessing the campus OES servers with either AFP or CIFS using MacOS 10.7 (Lion).  AFP will fail with an error about the version of the protocol you're using not being supported, and CIFS may cause a kernel panic on the Mac and crash the computer.  Apple and Novell are working on patches and workarounds for both issues and we will update as solutions should become available.


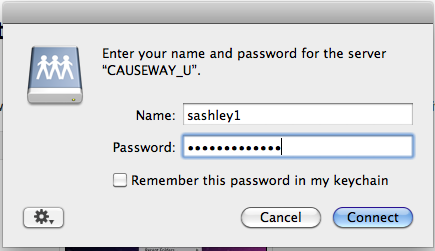
3. The Login window will pop up.

Enter your Drew username for "Name:" and Drew password for "Password:".

These are also known as your uLogin credentials.


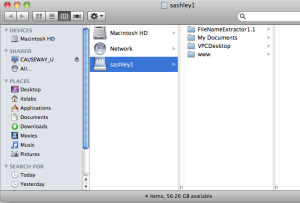
3. The drive you selected will then appear as a folder on your screen.


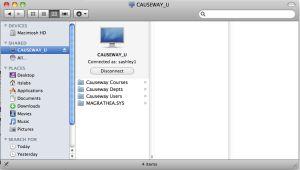
4. Clicking on the CAUSEWAY_* option in the left-hand pane may allow you to see other drives you could access at the same time. However, these may not always be present depending on server load balancing, so the best practice is to establish a separate connection (as above) to each drive you need. 

Causeway2 Courses is equivalent to the T: drive on a PC.
Causeway2 Depts is equivalent to the O: drive on a PC.
Causeway2 Progs is equivalent to the P: drive on a PC.
Causeway2 Users is equivalent to the U: drive on a PC.


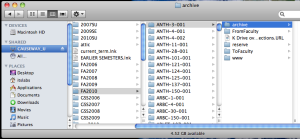
5. For example, to find your K: drive, click Causeway Courses, where you will see one folder for each semester.

From there find the semester you want, and your course


6. To logout, click once again on CAUSEWAY2_U (or CAUSEWAY2_O or CAUSEWAY2_P) if you connected to your department drive, CAUSEWAY2_T if you accessed your K: drive) in the left-hand column and click Disconnect.

...