...
- Open Finder
- In the Favorites list on the left, click on the "Drew Network" folder
- Open your F: drive from the main window.
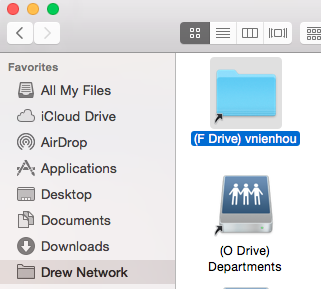
Note: When using "Save As", click on the arrow next to the file name to expand the locations you can save to. Choose "Drew Network" from the Favorites list, and then navigate to the desired folder.
Computer Not Provided by Drew
...
- Read - Permits viewing and listing of files and subfolders
- Write - Permits adding of files and subfolders
- Read & execute - Permits viewing and listing of files and subfolders as well as executing of files; inherited by files and folders
- List folder contents - Permits viewing and listing of files and subfolders as well as executing of files; inherited by folders only
- Modify - Permits reading and writing of files and subfolders; allows deletion of the folder
- Full Control - Permits reading, writing, changing, and deleting of files and subfolders
| Excerpt | ||||
|---|---|---|---|---|
To grant other users permissions to your folders
The U: drive can be accessed the same way as the F: drive.
|
The Employee Network Drives (G, O, and P)
...
The T: drive contains one folder for each semester you've been at Drew. Inside is what the K: drive showed you during that semester. This archive allows you to find course specific information from earlier in your time at Drew.
**Please note: Summer courses will access their current course folders via the T: drive, rather than through the K: drive. Students and faculty will find their folders in, for example, "T:\2018 Summer Terms".
The R: drive is the “old attic,” a legacy drive that contains an older system of network software and communication processes. You will generally not need to use this drive and students generally do not have access to it.
...
On a laptop PC issued by Drew University, there is also an I: drive, a partition of the C: drive. If you save a file (but not a program) on these laptops, it will go to the I: drive by default. Because of this, if the C: drive becomes corrupt and must be reimaged, files saved in the I: drive can sometimes be maintained. If the hard drive itself is damaged, the files cannot always be recovered from either the C: or the I: drives. As long as you have your computer with you, the I: drive is available.
Child Pages
| Children Display |
|---|
Please Share!
You can direct others to http://tinyurl.com/MyNetworkDrives so they can also access this information!