Copy Tutorial Data Files to the Desktop
- Go to the Start menu
- Click My Computer
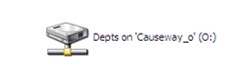
- Double click on the O: Drive (click on image to enlarge)
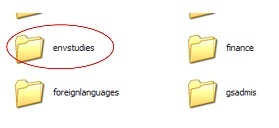
- Folders are listed alphabetically by department acronym. Double click on the envstudies folder (click on image to enlarge)
- Double click on the GIS Tutorials folder
- Right Click on the Geocoding folder and choose the Copy option
- Close the GIS Tutorials folder
- Right click anywhere in the blank, blue space on your computer's Desktop.
- Choose the Paste option. You should now see the Geocoding folder on your desktop.
Start a New Map Project
- Open ArcMap

- The ArcMap Getting Started dialog box will appear
- Under the Table of Contents on the left side, choose New Maps My Templates Blank Map.(click on image to enlarge)
- Click OK. A blank Map Project will appear.
Add a Basemap to the Map Project
- Click the Add Data button
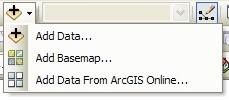
- Click Add Basemap. The Add Basemap dialog box will appear. This will allow you to add a default basemap from the ESRI servers.
- Choose the Streets basemap.
- Click Add. The Streets basemap will appear in your Map Project. It may take a few seconds to process, since you are downloading a map from a remote server.
- Once the Streets map appears, click on the Zoom In tool.

- Click and drag with the Zoom In tool around the New York City area.
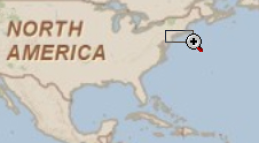
Continue to use the Zoom In tool until you have the island of Manhattan between I-895 (North) and I-478 (South) centered in your viewing window.
Create a Spatial Bookmark
Zooming In adjusts the map's scale so that you can see features like streets and read the labels. To make sure that you can come back to the map at this scale, you can create a Spatial Bookmark.
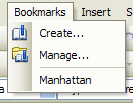
- Click on the Bookmarks pull down menu at the top, left-hand side of the screen.
- Choose Create.
- In the Spatial Bookmark dialog box that appears, name your Spatial Bookmark "Manhattan."
- Use the Bookmark pull down menu – your "Manhattan" Bookmark should be there.
Now any time you want, you can use the Bookmark tool to zoom out to the scale you created with the Manhattan bookmark. To erase or re-organize Bookmarks, use the Manage function.
Add Address Data to your Map Document
When Geocoding, you will need to have prepared address information that ArcMap can use to locate the addresses. In this tutorial, there is prepared address information in the Geocoding tutorial file you downloaded onto the Desktop of your computer. When Geocoding with custom address information, you will need to create your own Excel files with properly formatted address information to use.
- Click the Add Data button.
- Choose the Add Data... option.
- Use the Browse button to find the Geocoding folder on your desktop.
- Inside the Geocoding folder, click on points_of_interest.csv
- Click Add
- The address data included in the points_of_interest.csv file is now added to your Map Project.
To inspect the way that the address information is formatted in the .csv file:
Right-click on points_of_interest.csv in the Table of Contents
Choose the Open option. The Table dialog box will appear (click on image to enlarge)

In this table, the street, city, and state information are all placed into different columns. Zip code information is not included, but it can be helpful when trying to reconcile Unmatched and Tied addresses.
Geocode Addresses
- Locate the Geocode Toolbar in your Toolbar menu.
- If you do not have the Geocoding Toolbar installed, click the Customize menu → Toolbars → Geocoding. The Geocoding Toolbar should now appear for you in ArcMap. (click image to enlarge)

- Find and click the Geocoding button located on the Geocoding Toolbar.

- The Choose an Address Locator dialog box will open.
- Choose the Address Locator you want to use. If you do not have a custom Address Locator, or if you are not sure which Address Locator to use, for geocoding addresses in the U.S., click on either 10.0 US Streets Geocode Service (ArcGIS Online) or 10.0 North America Geocode Service (ArcGIS Online). The Geocode Addresses: Locator... dialog box will appear.
- Check the Address Input Fields to be sure that they match with the fields in the data you are using. Under Output: Output shapefile or feature class, use the browse button to navigate to the file location or personal geodatabase you want the geocoding result to be saved to.
- When all fields have been checked for accuracy, click OK. The Geocoding Addresses... dialog box will appear and show the progress and results of the geocoding session.
Often there will be addresses that are left Tied or Unmatched. (click on image to enlarge)

- Tied addresses have more than one possible candidate for a match in different locations
- Unmatched addresses don't show any possible candidate for an address match in the Locator service.
- For more on geocoding a table of addresses, see the document by ESRI, Desktop 10.0 Help - About geocoding a table of addresses.
Tied and Unmatched addresses can be reconciled by hand.
Matching Tied and Unmatched Addresses
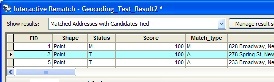
If the Geocoding Addresses dialog box shows you Tied or Unmatched addresses, click the Rematch button. This will open the Interactive Rematch dialog box.
To reconcile Tied or Unmatched addresses, begin by having the Interactive Rematch function display only the records you want to try to rematch. To do this:
- Under Show results:, click on the arrow to open the pull down menu. (click on image to enlarge)
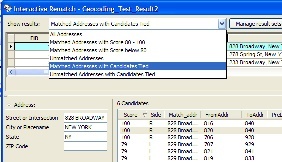
- Select the available option that will display only the results that you wish to try to reconcile.
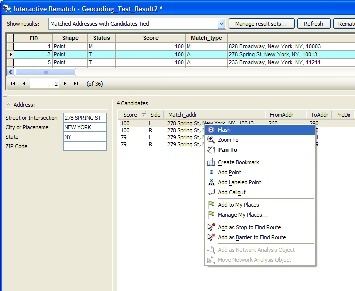
- Select one record under Show results by clicking on the box in the row next to the FID of the record you wish to reconcile. When it is properly selected, an arrow will appear in the box you clicked and the row of the record will be highlighted in cyan.(click on image to enlarge)
- Under Candidates (the main part of the dialog box in the bottom, center), choose the Candidate for a match that you think is the correct match for the address you are trying to reconcile. If you aren't sure of the location of the Candidate, you can
- Click on the candidate to highlight it
- Right Click on the highlighted candidate. A pull down menu will appear.
- Click on the Flash option displayed in the pull down menu. This will briefly "flash" the location of the Candidate to display its location.
- Inspect the address information to the left of the Candidate display section. Many Unmatched addresses occur because of mistyped information. If the address information is mistyped, simply make corrections in this area.
- Once you've determined which candidate to use, and/or you've corrected the address information, highlight the correct Candidate by clicking once.
- Click the Match button at the bottom, right-hand corner of the Interactive Rematch dialog box.
- Repeat until all Unmatched and Tied addresses have been reconciled.
Accessing the Interactive Rematch Dialog Box from a Previously Saved Geocoding Session
If you have a saved Map Project with Geocoded, Unmatched or Tied addresses that you want to re-Match, do the following to access the Interactive Rematch dialog box.:
- Open ArcMap
- Click the Tools menu → Geocoding→ ReviewRematch Addresses.
- Choose the Map Layer of your Geocoding Results. The Interactive Rematch dialog box will appear.