Gmail integrated view

  1. Updates to Interface, spring 2022: Google will start rolling out a new "integrated view" to Gmail on Feb 28, 2022. It will be optional until approximately June 2022. Learn more about integrated view from Google here, https://support.google.com/mail/answer/11555490?hl=en.
    1. The new view will allow you to collapse the panel on the left
      In this example, you see the Mail app chosen and the collapsible panel open.
      Here is a picture with that side panel collapsed, giving you more room to work within the selected app (Mail, Chat, Spaces, and Meet by default).

Google Workspace Learning Center

Google provides extensive documentation on using Gmail in the Google Workspace Learning Center.

Gmail Features

Snooze

  1. You can hide a message from your inbox until a set date and time using the Snooze feature. Read more about Snoozing an email here.
  2. Please note: You have to have conversation view turned on in order to use the Snooze feature.

Nudges

  1. Nudges will bring an email to the top of your inbox with a suggestion to reply (to an email you haven't responded to) or follow up (on an email you sent which hasn't received a response). Read more about turning off nudges here.

    *

*Image from https://www.howtogeek.com/356781/the-8-best-features-in-the-new-gmail/

Delegation

The following information comes from https://support.google.com/mail/answer/138350?hl=en, with slight adjustments for the Drew domain:

Delegates can read, send, and delete your email messages. They can’t chat with anyone for you or change your Gmail password. When they send a message, their email address appears.


  1. On your computer, open Gmail. You can't add delegates from the Gmail app.
  2. In the top right, click Settings Settingsand thenSee all settings.
  3. Click the Accounts and Import tab.
  4. In the "Grant access to your account" section, click Add another account.
  5. Enter the email address of the person or group you want to add.
  6. Click Next Step and then Send email to grant access.

    The person you added will get an email asking them to confirm. The invitation expires after a week.

    If you added a group, all group members will become delegates without having to confirm. 

    Note: It may take up to 24 hours for the delegation to start taking effect.

Viewing an Account you have Delegated Access to

  1. Navigate to mail.drew.edu.
  2. Log in to your regular Drew account if prompted.
  3. Click on the Drew logo in the top right (with your profile icon or initial) to expand the menu.
  4. Under "Manage your Google Account", you will see listed any of the other email accounts you have delegated access to. Click on the one you need and it will open in a new tab.

Please note: You cannot access delegated email accounts using a mobile phone app or any third-party email software such as Outlook or Thunderbird.


To learn more about the options that are available - like snoozing an email, using Smart Reply, and viewing your Calendar or Tasks - we suggest this Help Center article or this video from Teacher's Tech.

Advanced Gmail Features

There are a number of advanced features available for use with Gmail. Most of these options are available in Settings on the Advanced tab.

Please note that we can assist with locating these features, but cannot be responsible for use of these tools nor their continued availability. It is also important to note that what you can turn on or off in a delegated inbox varies (and sometimes changes as Google works to improve their services).

Templates are an advanced feature in Gmail that let you create and save emails as templates. These templates are usually used in situations where you find yourself sending the same information repeatedly.

Activate Templates

  1. In Gmail, click on the gear icon and choose Settings.
  2. Go to the Advanced tab.
  3. Click "Enable" next to "Templates".
  4. Scroll down and click Save Changes.

Create a Template

Next, compose an email to use as an email template.

Tip: To avoid having duplicate signatures in your emails, delete the signature from your template before saving it (or save it again!). This way, if your signature changes, the most up-to-date version will appear on your emails.

When you are ready to save your template, click on the three dots in the bottom right of the compose window (1).
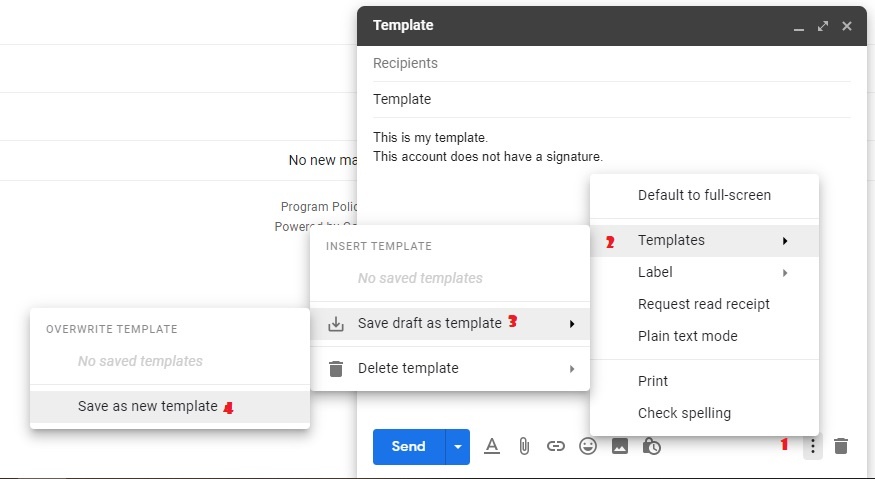
Choose Templates (2).

Choose "Save draft as template" (3).

Choose "Save as new template" (or choose to replace an existing template) (4).

Name your template when prompted. Consider a name more easily distinguishable from any other templates you create - especially if using the template in a shared inbox.

Using a Template

Open an email reply or a new compose window.

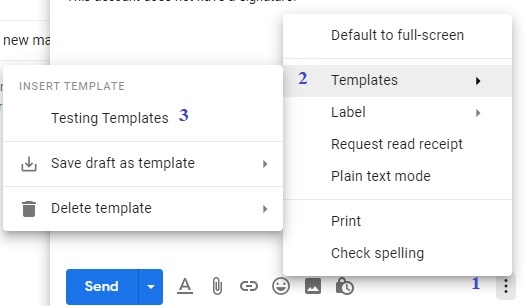
Click on the three dots in the bottom right of the compose window (1).

Choose Templates (2).

Choose your desired template from the list of available canned responses under "INSERT TEMPLATE" (3).


There are many options available for organizing your inbox in Gmail.

To learn about the different options available and how to use them, please see the article in the Google Workspace Learning Center on choosing an inbox type.

Priority Inbox uses Google AI to sort email for you (with input from you).

You can also use categories with a tabbed inbox. These work in combination with Google AI and your input as well.

Multiple Inboxes is an option that allows you to manage more than one inbox using forwarded mail and/or label filters.


If you want to confirm that someone receives and opens an email message, you can request a read receipt.

Importantly, your Drew email can only request a read receipt from another Drew email address, and that address cannot be a group mailing list or an alias.

Also, there are a number of situations when a read receipt will not be generated - especially if someone reads an email on their phone.

Learn more about how to request a read receipt and when they may not be returned at this Google support page.

Please note the warning at the end: Do not rely on a read receipt to tell you that an individual actually read your message.


When you receive an email that includes recipients outside the Drew organization, Google will automatically label it "External".

  • This label will be visible in Gmail on the web and Android devices; it is not yet available on iOS.

When you reply to an email that includes an address not in the Drew domain and not in your contacts, you will see a warning banner.

  • The banner advises you to be careful with what you send, telling you the address that sparked the warning.
  • External warning banner
  • You can dismiss the warning by clicking the X to the right of the banner. You will not be warned when emailing that address again.


Drew has some of Google's advanced security protections enabled. These protections mean that you will get an email but will see a warning banner telling you a little bit about why Google flagged the message. Some of the warnings you may see include:

FAQ

Some of the specific questions we have been asked are listed and answered below. 

Google calls the auto reply a "Vacation Responder", or an out of office or vacation reply. Instructions for setting one up, choosing the dates when it will send, adding the message, and deciding who will receive the response, can be found at https://support.google.com/mail/answer/25922.


Contacts

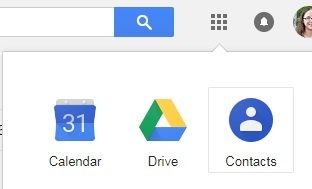
  1. To view your contacts (the accounts you email), click on the Apps Grid (the box of 9 small squares by your profile picture) and find Contacts in the list of Google Apps.
  2. For more information about Google contacts, see this article: https://support.google.com/contacts/answer/1069522
  3. To import contacts, you can use a .csv file. (You can export a group of contacts - or label - specifically, in order to share a list you built with others on campus)
    1. Go to Contacts.
    2. Expand the 3 hamburger menu on the left and click the word "More" to expand that section of the menu.
    3. Choose "Import" and navigate to your file.

Google Contact Labels or Groups

You can learn about viewing, grouping and sharing contacts at this support article: https://support.google.com/contacts/answer/30970?hl=en

Note that Google's instructions tell you to create a group by creating a "Label". The two terms are used somewhat interchangeably.


To access delegated account please follow steps below:

1. Click on the image or initial icon at the top right corner of your screen
2. In the drop-down menu that appears, once the mailbox has been delegated you will see the mailbox listed with (delegated) after the email address. Click on the delegated account (note: If you have a lot of shared mailboxes, you may need to use the scrollbar on the right to view them all).
3. The shared/delegated account will open in a new tab or window. It will look just like another inbox but will NOT include: 

  • Chat
  • Calendar, Docs/Drive, Sites (calendars are delegated separately and will be accessed through My Calendars or Other Calendars in your Google Calendar view)
  • Add-ons
  • Access to some account settings
  • Themes

Note: Once you have been added as delegate it may take up to 24 hours for delegated account to appear below your primary account.


Please refer to Google's instructions, at https://support.google.com/legal/answer/8151, and take note of their advice:

Note: If someone uses Gmail to harass, intimidate or threaten you, they're violating Gmail's Programme Policies. If you feel that you're in danger, contact your local authorities straight away and ask whether any cyber harassment laws apply to your situation.

Additional Resource:

We once offered a workshop on Managing a Gmail Inbox. The slides can be viewed here.

This article also offers time management suggestions that culminate on an inbox management system - shared as a series of video tutorlals.


Reviewed June 5, 2023