This tutorial was expanded and adapted from Thomas, R.. (2008). In Time and Place, "Dust Bowl." Retrieved October 5, 2010, from In Time and Place: http://www.intimeandplace.org/Dust%20Bowl/index.html.
Thomas' focus is in teaching GIS skills. Many humanities and social sciences instructors may want to use these excellent resources, but feel that teaching GIS to students is outside the scope of their curriculum. This ArcGIS Explorer Desktop adaptation of the Dust Bowl unit is meant to aid instructors who do not have access to ArcGIS software or who might not have the time to teach GIS skills in the classroom. All files for the tutorial are included in a link on this page. Original versions of files (shapefiles, raster files, and ArcMap files) on which the layer files for this tutorial were based can be found under the link for the Dust Bowl GIS files at the original site.
Other tutorials using GIS for American History, including units on The Great Migration, Japanese Internment during World War II, and others can be found at In Time and Place.org.
Install ArcGIS Explorer Desktop
If you do not have it already, you will need to install ArcGIS Explorer Desktop. You can download the program for free at the ArcGIS Resource Center Download page.
Follow all instructions under the topics, "Getting Ready to Use ArcGIS Explorer Desktop," and "Download ArcGIS Explorer Desktop." If you require assistance with the download process, click on the yellow Get Support button at the bottom of the left hand side of the download page.
Download Dust Bowl Tutorial Files
All files, including copies of Rick Thomas' original GIS files, have been included in the package for this tutorial. Layer files (all files with the .lyr file extension) were created by Krista White, GIS Support Specialist, Drew University. All other files were created by Rick Thomas. Thomas' original files are included because they serve as a source for the Layer Files (.lyr files)used by ArcGIS Explorer. Some original files have had a spatial reference added to them for the purpose of creating the Layer Files.
- Download the zipped tutorial files at: Dust Bowl.zip. Be aware that the zipped package is approximately 41MB, so please allow sufficient time and memory space on your computer for download.
- A dialog box will appear titled, "Opening Dust Bowl.zip." Save the file to your computer's Desktop.
- Navigate to the desktop of your computer and unzip the file. To do this, right click on the Dust Bowl.zip folder. (click image to enlarge)
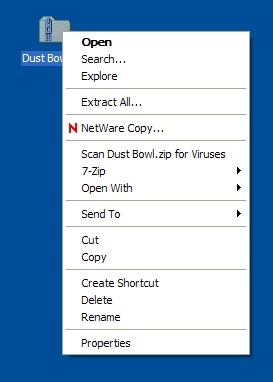
- Choose Extract All. The Windows Extraction Wizard will appear.
- Click Next. Make sure that the field under "Files will be extracted to this directory" points to your computer's desktop. (click image to enlarge)

- If it does not point to your computer's Desktop, click the Browse button. The select a destination dialog box will appear.
- Choose the Desktop option that appears at the very top of the window in the dialog box. You may need to use the scroll bar on the right hand side of the window to see the Desktop Option. (click image to enlarge)
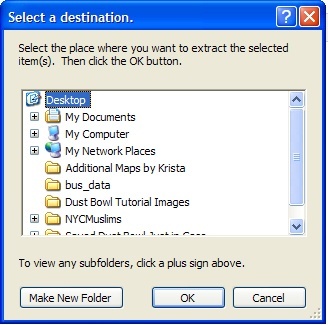
- Click OK.
- Once this field points to your computer's Desktop, click Next. Windows will unzip the file and tell you that the extraction is complete.
- During the unzipping process, you may get a dialog box asking you to replace a file: (click image to enlarge)
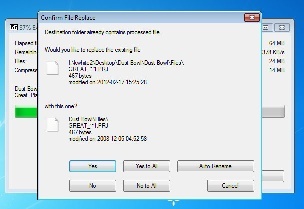
This action attempts to replace an older file with an existing new file. Click the No button to prevent the replacement of the newer file. - Click the Finish button.
Getting Started with ArcGIS Explorer Desktop
Once it's been successfully installed and you've downloaded the software, open up ArcGIS Explorer.

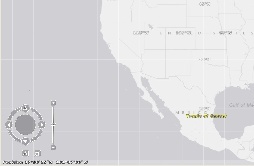
To zoom in and out of the map, you can access the map navigation controls by rolling your mouse over the small navigation widget in the bottom, left hand corner of the screen (click image to enlarge)
Change the Basemap
The default Basemap in ArcGIS Explorer is a satelite photo mosaic. This can be distracting when dealing with certain kinds of data, so users may want to change the Basemap to something less visually distracting.
- On the Home tab in the Maps group, click on the Basemap button. A drop down menu will display a set of Basemap options.
- Use the scroll bar on the right hand side of the Basemap drop down menu to scroll down to the bottom of the list.
- Chose the Light Gray Canvas map by highlighting and clicking it once. (click image to enlarge)
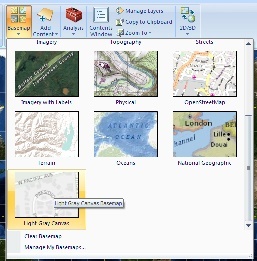
Now the map background is neutral, and is ready to have the Dust Bowl tutorial data layers added to it.
Add Dust Bowl Tutorial Data Layers to ArcGIS Explorer Desktop
Navigate to the Dust Bowl folder on your computer's Desktop. You should see a list of files like this: (click image to enlarge)

The files with the yellow diamond icons with the .lyr extension are ArcGIS layer files. You can add layer files, raster files, shapefiles, and a wide variety of other kinds of file types to ArcGIS Explorer. Because there is limited capability for changing the Symbology of Shapefiles in ArcGIS Explorer, this adaptation of the Dust Bowl tutorial uses layer files created with the proper Symbology for the analyses required in the Dust Bowl worksheets.
For each of the following exercises in the Dust Bowl tutorial, you will add the layer files in reverse order. This will insure that they are ordered properly by group and by month/year so that users can make sense of all the data categories.
Create an Examining Conclusions Worksheet Map
Layer Files:
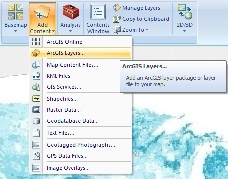
- In ArcGIS Explorer, click on the Add Content button in the Map group of the Home tab.
- Click ArcGIS Layers. An Open dialog box will appear. (click image to enlarge)
- Find the Dust Bowl folder on your computer's desktop.
- Add files in the following order:
- APR4YRAVT – Question 3 (April average temperatures for the year s1930-1934)
- MAR4YRAVT-- Question 3 (March average temperatures for the year s1930-1934)
- FEB4YRAVT-- Question 3 (February average temperatures for the year s1930-1934)
- JAN4YRAVT-- Question 3 (January average temperatures for the year s1930-1934)
- APR35AVT-- Question 3 (Monthly average temperatures for April of 1935)
- MAR35AVT-- Question 3 (Monthly average temperatures for March of 1935)
- FEB35AVT-- Question 3 (Monthly average temperatures for February of 1935)
- JAN35AVT-- Question 3 (Monthly average temperatures for January of 1935)
- WINTSPR35 – Question 2 (Average total rainfall in the months January - April for the year 1935)
- WINTSPRAVE-- Question 2 (Average total rainfall in the months January - April for the years 1930-1934)
Raster Data:
- Click on the Add Content button in the Map group of the Home tab.
- Choose Raster Data.... An Open dialog box will appear.
- Find the Dust Bowl folder on your computer's desktop.
- Double click on the folder titled Files.
- Add the 3907_%Sandy Soil.jpg (for Question 1) file to your map by clicking on it once, then clicking the Open button. (click image to enlarge)

Shapefiles:
- Click on the Add Content button in the Map group of the Home tab.
- Choose Raster Data.... An Open dialog box will appear.
- Find the Dust Bowl folder on your computer's desktop.
- Double click on the folder titled Files.
- Add files in the following order:
- Dust 1940-- Question 1 (Areas of most severe dust for 1940)
- Dust 1938-- Question 1 (Areas of most severe dust for 1938)
- Dust 1930-- Question 1 (Areas of most severe dust for 1930)
- United States – For General Reference
View the Symbology of the Shapefiles
Because the Layer Files used in this tutorial were all made from the same set of files in ArcMap, they all have the same label name. However, you can view the Symbology of each Layer File, and the data to which it refers, by clicking on the plus sign next to the label name to expand and display them.
Change the Symbology of the Shapefiles
In order to read all of the data for the worksheets, the Symbology of the Dust layers and the United States needs to be changed so that other data can be seen underneath them. Fortunately, the changes to Symbology required for these Shapefiles are within the capabilities of the ArcGIS Explorer functionalities. To change the Symbology of a data layer in ArcGIS Explorer:
- Click on the plus sign next to the name of the United States layer file to expand and view the Symbology.
- Right click on the symbol for the Shapefile layer.
- Choose Symbol. A new Symbol menu will appear.
- Use the scroll bar on the right hand side of the Symbol menu to scroll down until all fo the Outline Fill options are visible. (click image to enlarge)

- Choose the Blue Outline Fill by clicking on it once.
- Repeat steps 1-5 for the Dust 1940, Dust 1938 and Dust 1930 layers, giving them all a different colored Outline Fill.
Removing Layer Files, Shapefiles and Raster Layers from Your Map
- If you added something in the wrong order, you can remover any of the File Layers you added:
- Right click on the Label Name of the File Layer. A pull down menu will appear.
- Choose the Remove option by clicking it once. The Remove dialog box will appear, asking you if you are sure you want to remove the layer from the map.
- Click Yes.
Making Layers Visible and Invisible
You can make layers visible and invisible by checking and unchecking the box next to each Label Name.
Save Your Examining Conclusions Map
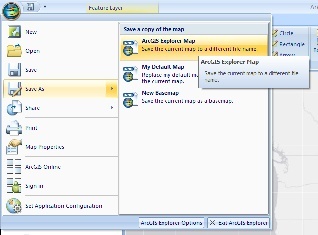
- Save your Examining Conclusions worksheet map by clicking on the round ArcGIS Explorer button at the top, left hand corner of the screen.
- From the pull down menu that appears, choose Save As.
- Click on the ArcGIS Explorer Map option to save the map with a name you give it. (click on image to enlarge)
- In the Save As dialog box, navigate to the Dust Bowl folder on your computer's Desktop.
- Name the file Dust Bowl Examining Conclusions.nmf.
- Click Save.
Create a Great Plains Farming Worksheet Map
Follow the same steps you used to Add Content to the Examining Conclusions Map. For the Great Plains Farming Map, add the Layers in the following order
Layer Files:
- 1940GreatPlainsHarvestedAcres - Question 1
- 1930 GreatPlainsHarvestedAcres - Question 1
- 1940AvgAcresperFarm - Question 1
- 1930AvgAcresperFarm - Question 1
- 1940NoFarmsperCounty - Question 1
- 1930NoFarmsperCounty – Question 1
Shapefiles:
United States – General Reference
Change the Symbology of the Shapefile
Change the Symbology of the United States Shapefile as you did for the Examining Conclusions Worksheet Map.
Save Your Great Plains Farming Map
Name the file Dust Bowl Great Plains Farming.nmf.
Questions 2 and 3 of the Great Plains Farming worksheet are ArcMap practice exercises, and not suitable for use with ArcGIS Explorer.