If you find these tutorials useful and would like to link to them from your own pages,please contact the Drew Spatial Data Center Director, Dr. Catherine Riihimaki via email. You are invited to leave comments or ask questions in any of the Comment areas of each tutorial page.
This tutorial will walk you through the basic skills needed to use Google Earth.
Navigating in the 3D Viewer
The 3D viewer is the center section of the Google Earth screen that displays the map.
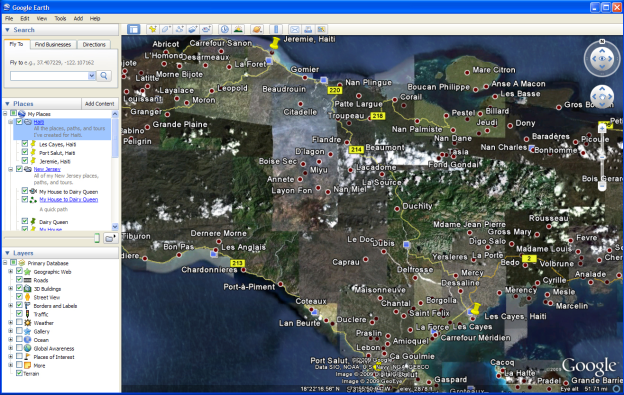
To navigate through the 3D Viewer, use the navigation tools on the right-hand side of the screen.
The Look joystick lets you adjust the view in the 3D viewer from a single vantage point as if you were turning your head.
Google Earth Navigation Look Joystick
The Move joystick lets you move from location to location in the 3D viewer.
Google Earth Navigation Move Joystick
The Zoom slider lets you zoom in and out of the 3D viewer to get
a closer or more remote view.i
Google Earth Zoom Slider
For more on Navigation in Google Earth, visit http://earth.google.com/userguide/v4/#navigating
Creating Placemarks
Placemarks allow you to insert an icon that marks a location in the 3D viewer on Google Earth.
- Search for the location you want to mark in the Search box at the upper, left-hand corner of the screen.
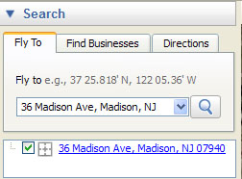
- Use the Zoom slider to zoom in far enough to distinguish the place you want to mark from other, nearby locations.
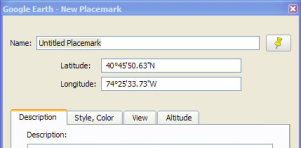
- Click on the Add Placemark icon
 at the top of the Google Earth screen. A New Placemark dialog box will appear:
A Placemark icon will also appear in the 3D viewer.
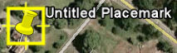
- Scroll over the Placemark icon with your cursor until the cursor becomes a pointing hand. Click and drag the Placemark icon to the location you want to mark in the 3D viewer.
- In the New Placemark dialog box, name the Placemark, and change its settings as desired using the tabs.
For more information about Placemarks, visit http://earth.google.com/userguide/v4/ug_placemarks.html
Add Content to Placemarks
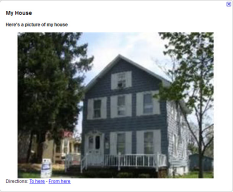
You can add interactive content to a Placemark by using HTML code. The interactive content will show up when you click on the Placemark in the 3D Viewer or when you click on the Placemark name in the Places layer.
- Right-click on the name of the Placemark you want to enhance.
- Choose Properties.
- In the Description tab, place the following (or similar) HTML code:
<b>yoursubtitle</b>
<p>
<img srce="http://for a picture you own on Flikr or an image that came from a free web site*">
<br>
<a href="http://for web site where you got the photo if it is not yours/">Photo Source</a>
<p>
<b>Book:</b> <i>titleofbook</i></b>
<p>
<b>Author:</b><a href="http://of interesting web site about the author/">authorname</a></b>
<p>
<b>Location:</b>Where the book takes place
<p>
<b>Time</b>Time period of bookii
Items in bold/red represent information you will have to fill in that is specific to the book or place represented by the Placemark.
*You should never take photos from a source unless you have explicit permission to do so.
4. Once you are finished filling in the proper content, click OK.
5. In order for the content enhanced Placemark to show up, you will need to close Google Earth and reopen it.
6. Click on the Placemark in Google Earth. The content you added should now appear in the pop-up box next to the Placemark.
For more on adding content to Placemarks, go to:
http://web.mac.com/jburg/GoogleLit/Lit_Trip_Tips_files/FormattingPlaceMarkers.pdf
Creating Paths in Google Earth
Paths are marked trails you can create to show movement from one place to another.
- Create a Start Point: Search for the place where you would like your Path to begin and add a Placemark, if desired, by using the Add Placemark tool.
- Create an End Point: Search for the place that you want to end your Path. Mark it with a Placemark, if desired.
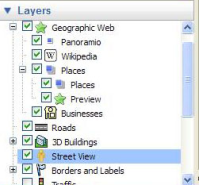
TIP: If you are creating an urban, street-level Path, you will want to zoom in so that you can see the names of places and streets you want included in your Path. If you are using streets to create your path, you will want to be sure to have the Roads layer checked in the Layers menu.
Create the Path with Markers
- Click on the Add Path tool in the toolbar at the top of the screen.
 The Google Earth New Path dialog box will open.
 - Name the Path, but do not click OK.
- On the map screen, your cursor will become a square targeting Sight. When you click on the map with the Sight, a square Marker will appear. Clicking on a new area creates a new square Marker connected to the first marker with a line. These connected Markers create a Path.
- Create a path by placing your first Marker at the Start point. The last Marker should be at the End point. It's important to create a Path from Start to End if you want to turn the Path into a Tour (see below).
- You can delete the last Marker you created by pressing the Delete key
- You can highlight an already existing marker by rolling over it until the Sight becomes a pointing hand icon. Click with the pointing hand on the Marker to highlight it.
- You can delete Markers by highlighting them and pressing the Delete key.
- You can move Markers by highlighting, clicking, and dragging them.
- Once you have created markers that extend from the Start location to the End location, click OK in the Google Earth - New Path dialog box. Your Path will automatically be saved in the Places menu.
- To Delete a Path, simply right-click on its title, and choose Delete from the pull-down menu. A dialog box will appear, asking if you are sure you want to delete the Tour. Click OK.
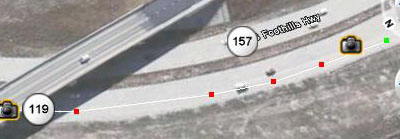
TIP: To create Paths that follow tight corners, as with sharp curves in a highway, zoom in and create a number of Markers close together to mimic the curve of the road (as above).
For more information on creating Paths, go to:
http://earth.google.com/userguide/v4/ug_drawing.html
Create a Tour from a Path
Tours are an easy way to get an animated, birds-eye view of a path you've created.
- Highlighting the Path you want to make into a Tour in the Places menu.
- Click on the Path button that appears at the bottom of the Places menu. The Tour of your Path will start to play in the 3D Navigation window, and the Play Tour menu will appear in the bottom, left-hand corner.
- As the Tour begins to play, click on the Save button at the far right of the Play Tour menu.

- Name the Tour and provide any additional information you like in the Description field.
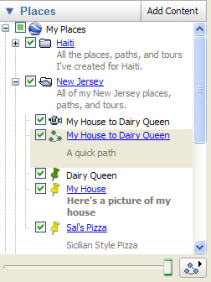
- The Tour will automatically be saved in your Places menu.
For more information on Tours, go to:
http://earth.google.com/userguide/v4/ug_touringplaces.html
Create and Manage Folders for Places
Folders can help organize multiple, short paths used to make up longer Trips and Tours.
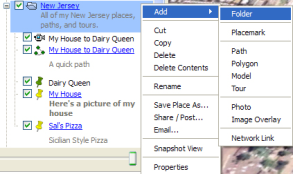
- In the Places menu, right-click on any white area to reveal a pop-up menu.
- Choose Add→Folder. The New Folder dialog box will display.
- Name the Folder and give it a Description.
!worddavce26f1c3184a368986b2c683a60d79bd.png|height=131,width=291!
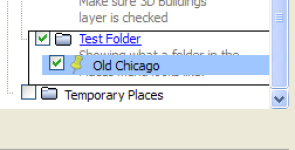
#Choose Allow this folder to be expanded if you want to be able to see all the contents of a folder in the Places menu. - Click OK. The Folder will appear in the Places layer.
- Add items to the Folder by clicking and dragging them until the Folder is highlighted with a black outline:
- Move or remove items by clicking and dragging them from the Folder to the desired location in the Places layer.
For more information about Folders, go to:
https://earth.google.com/support/bin/static.py?page=guide.cs&guide=22364&topic=22368&answer=148149
Saving, Sharing, and Managing Places
Email a Place file
- Right-click on the name of the Place you want to send via email.
- Choose Email….
- A dialog box will appear, asking which email service you want to use to send the file. Choose GroupWise/Use my default email program (this option will appear if you are using your Drew computer).
- If you already have GroupWise open on your desktop (not WebMail, but the installed GroupWise client), a new email message will appear with a .KMZ file attached. .KMZ is the file extension for Google Earth files.
- If you do not have GroupWise opened, Google Earth will open GroupWise and display the email with a .KMZ file attached.
- If you are not using your Drew computer, choose the appropriate email program displayed in the dialog box.
- Type in the email address for those to whom you wish to send the Google Earth/.KMZ file.
- Click Send.
Save a Place File to a Location Other than the Places Layer
If you create many Places, Paths, & Tours in Google Earth, having them all saved in the Places layer can eventually slow down your computer. You may want to save some files in another location, and open them in Google Earth only when you need them.
- Right-click on the name of the Place you want to save to a new location.
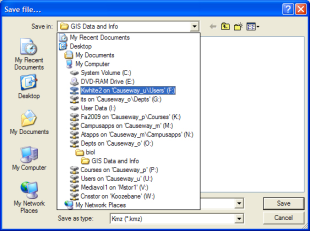
- Choose Save Place As…. The Save Place dialog box will appear.
- In the Save in field, click on the black arrow to reveal a list of locations to which you can save the file.
- Choose your F: or K: drive folders (if logged in on campus), or another location, such as a USB flash drive.
- Choose the folder/location on the drive where you want to save the Place from Google Earth.
- The Place file will be saved as a .KMZ file.
Open a Place File from a Location Other than the Places Layer
To open a place file someone has shared with you, you must first save it (see directions above).
- In Google Earth, click on the File pull-down menu.
- Choose Open…..
- Navigate to the location where the .KMZ file is saved.
- Double-click on the name of the file. The new Place file will open in Google Earth and save automatically to your Places layer.
Delete a Place from the Places Layer
- Right-click on the name of the Place you want to Delete.
- Choose Delete from the pop-up menu.
- A dialog box will appear asking if you are sure you wish to delete the Place. Click OK.
For more information on managing Place files, go to:
http://earth.google.com/userguide/v4/ug_places.html
i Adapted from "Google Earth User Guide: Navigating," 2009, accessed September 22, 2009 from http://earth.google.com/userguide/v4/#navigating.
ii Adapted from Burg, J., "Google Lit Trips: Formatting Placemarker Pop-up Descriptions." 2009, accessed September 24, 2009 from http://web.mac.com/jburg/GoogleLit/Lit_Trip_Tips_files/FormattingPlaceMarkers.pdf
Resources
Burg, J. (2009, September 24). Formatting Placemarker Pop-up Descriptions. Retrieved
September 29, 2009, from Google Lit Trips: http://web.mac.com/jburg/GoogleLit/Lit_Trip_Tips_files/FormattingPlaceMarkers.pdf
Google, Inc. (2009). Drawing Paths and Polygons. Retrieved September 22, 2009, from Google
Earth User Giude: http://earth.google.com/userguide/v4/ug_drawing.html
Google, Inc. (2009). Marking Places. Retrieved September 22, 2009, from Google Earth User
Guide: http://earth.google.com/userguide/v4/ug_placemarks.html
Google, Inc. (2009). Marking, Saving, and Sharing Places. Retrieved September 23, 2009, from
Google Earth User Guide: https://earth.google.com/support/bin/static.py?page=guide.cs&guide=22364&topic=22368&answer=148149
Google, Inc. (2009). Navigating. Retrieved September 22, 2009, from Google Earth User Guide: http://earth.google.com/userguide/v4/#navigating
Google, Inc. (2009). Touring Places. Retrieved September 22, 2009, from Google Earth User
Guide: http://earth.google.com/userguide/v4/ug_touringplaces.html
Google, Inc. (2009). Using Places. Retrieved September 25, 2009, from Google Earth User
Guide: http://earth.google.com/userguide/v4/ug_places.html