Web access to your network drives
As part of our commitment to off-campus access, UT has implemented a way to connect to your network drives (F:, G:, K:, P: and U: ) through any web browser from off-campus. Access is provided through a secure web server, so that your password and your data are encrypted over the internet.
| Table of Contents | ||
|---|---|---|
|
What is
...
MyFiles?
NetStorage MyFiles is a secure service created for the purpose of allowing off-campus users access to their network drives when not on campus (or when working on a computer on campus that is not logged into the network). To use NetStorageMyFiles, you must have an active Drew uLogin account, a connection to the internet and a web browser. NetStorage MyFiles provides users with the ability to download, upload, and delete files from their network drives (F:, G:, K:, P:, and U:).
Using
...
MyFiles
Logging in (and out) of
...
MyFiles
You can use any browser to access NetStorage MyFiles (Chrome, Firefox, Internet Explorer, Safari, etc).
TreeHouse
- Log in to TreeHouse.
- Click the NetStorage MyFiles link in the Remote Access box on the Home tab.
...
- .
| Info |
|---|
Please note: This link will be updated over the weekend of January 30, 2015. In the meantime, you can continue accessing your network drives via the web using the NetStorage link. |
myfiles.drew.edu
- Type https://netstoragemyfiles.drew.edu in the Address URL address bar. Then press Enter.
- Log in with your Drew username and password.
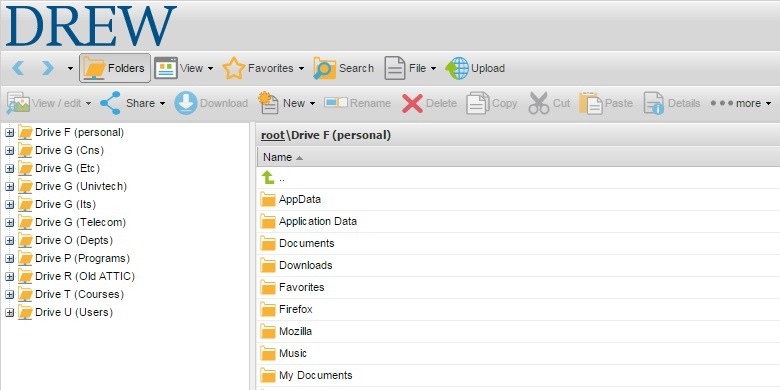
After logging in, you will see the a screen like that displayed below.

Accessing Network Drives
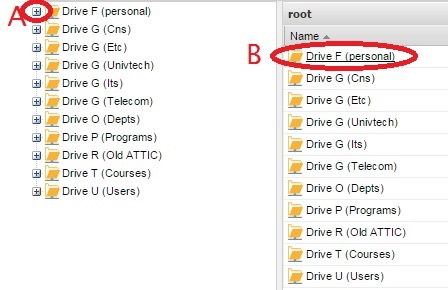
To access a particular drive/folder, click on the plus sign next to the name of the drive under the "Folders" column or double /folder in the column on the left (A) or single click on the name of the drive under where it says "Name." /folder in the main part of the window (B). A list of all the folders and files contained within that drive/folder will now be displayed on your screen. 
Logging Out
Once you are done, click on the Log Out button at the top of the screen (which looks like a door with an arrow pointing out). You may be brought to a blank screen; you can close the tab/window or enter a new URL in the Address bar.
Download a file
1. Expand drive folders until you find the file to download. 

2. Click on the File link or right Single click on the file .
3. A list of options will appear. Select Download to download the file. If you choose to open the file, it will be saved to a temporary folder. Be careful to "Save As" so that you can choose a more permanent location on your local computer while editing. If you choose to save the file, you can open, edit and save your changes to your local computer. (Firefox and Internet Explorer download windows shown below)

 to highlight it and select the Download button (A). OR Right click on the file and select the Download option from the menu (B).
Upload a File
1. To upload a file you have saved on your computer (to save it to your network drive), browse (in NetStorageMyFiles) to the folder where you want to save the file.
2. Click on the File link and choose Upload. Please note: Many internet browsers have popup blockers enabled, and you will have to choose to allow popups from netstorage.drew.edu in order to upload your file. 3.Click on the Browse or Choose File button to locate your file the Upload button along the top.
3. You have a few options for uploading files.
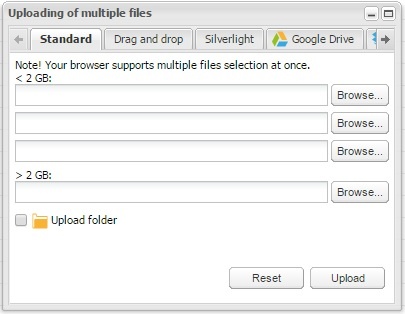
A. On the Standard tab, you can select Browse and navigate to the folder on your local computer with the file(s) you wish to upload. To select more than one file, use the Shift or Control keys on a Windows computer, Shift or Command keys on a Mac, and click Open. The name of your file(s) will be displayed
...
to the left of the Browse button. Click the Upload button
...
.
Please note that the maximum upload size for the first 3 fields is 2 GB. Use the final field, labeled "> 2 GB" to upload a larger file.
B. On the Drag and drop tab, you can use the standard method of selecting a file (or multiple files) from your local computer to the empty white space. You may find it easier to make your browser window smaller to facilitate seeing both your desktop/explorer/finder window and the Drag and drop MyFiles window. When you have the file(s) you desire, click the Upload button.
Please note: Each file cannot exceed 2 GB in size.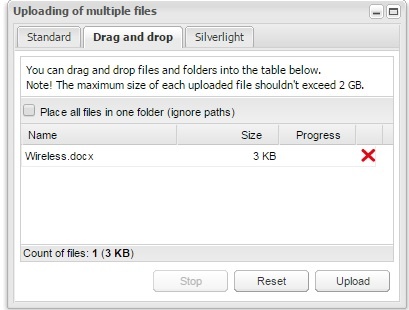
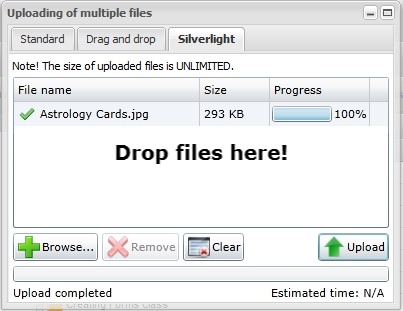
C. Another option is the Silverlight uploader. There is no file size limit when using the Silverlight uploader (but remember that you do have a quota on your personal drive's capacity). You have the choice to drag and drop or to Browse for the file(s). Click the Upload button when you are ready.
Please note: You may have Silverlight blocked in your browser; if so, follow the appropriate steps to allow it to run.
4. When you are finished uploading files, click the minimize button ( ).
).
Delete a file
1. Locate the file in MyFiles.
2. Single click on the file to highlight it and select the Delete button (A). OR Right click on the file and select the Delete option from the menu (B). You will be asked if you really want to delete the file. Choose Yes.
- Checking Overwrite existing files will replace any file with the same name as the one you are uploading.

Delete a file
1. Locate the file in NetStorage.
2. Click once on the file you're going to delete. You will see a check mark in the box in front of the file.

3. Go to the File link and choose Delete. 
4. If you delete something by accident, there is an undelete option. Click on the File link once and click on Undelete. This option is only available if you have recently deleted something.
Rename a file
1. Click once Single click on the file to select it.
2. Go to File > Rename. The file will be highlighted in a darker color.
highlight it and select the Rename button (A). OR Right click on the file and select the Rename option from the menu (B). 
2. Type the new file name.
3. Hit Enter on your keyboard3. Type in the change to the file name. A small window may briefly appear and then close.
Create a folder
1. Browse to where you want the new folder to be stored.
2. Go to File > New FolderClick on New and choose Folder from the menu.
3. A window will pop up asking you to name your folder. Type in a name and click OK.
Delete a folder
1. Click Right click on the folder once to select it.
2. Go to File > Delete.
name and select Delete from the menu. OR Single left click to the right of the folder name to highlight the folder (if you click on the name, the folder will open). Select the Delete button.
2. You will be asked if you really want to delete the folder. Choose Yes.
Logging Out
Once you are done, click on the Log Out button at the top right of the screen (which looks like a person about to run out a door with your username to the right).

If you do not need to do anything else while logged in to your Drew account, you can use the "Sign Out Completely" button at the top of the TreeHouse screen. Otherwise, continue on with your work!