| Table of Contents | ||
|---|---|---|
|
The network drives are a digital storage space for your files. They exist on the Drew University servers and act just like the C: drive on your personal computer. You must be connected to the Drew University servers in order to have access to them. This means that, on campus, your computer must be using a network cable or be connected to the drew1x wireless network - the drew wireless network will not allow you to connect to the network drives.
| Tip | ||
|---|---|---|
| ||
If you do not see your network drives, first restart your computer. This actually resolves the problem 9 times out of 10. If you do not see your network drives after a restart, make sure you are either plugged in with a network cable or are connected to drew1x if on campus. If you are off campus, you cannot see your network drives unless you CloudPC or MyFiles. |
The F: Drive
The F: drive is your personal network drive, a place on the Drew University servers where you can store files. We strongly recommend backing up your important documents files on the F: drive (or one of the departmental drives, as appropriate)! Even if your computer is destroyed, the files on saved to the F: drive will be accessibleremain available.
To reach the F: drive
Computer Provided by Drew
Windows
- Navigate to Computer This PC or File Explorer (in Windows 710)
- Select the F: drive in the Network Locations section or type F: into the search address bar of the Start menu File Explorer and hit Enter.
When off campus or using a computer not logged into the Drew network, you can reach the F: drive by going to the TreeHouse main page and selecting NetStorage in the Remote Access box.
...
Mac
- Open Finder
- In the Favorites list on the left, click on the "Drew Network" folder
- Open your F: drive from the main window.
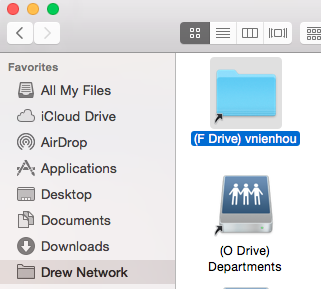
Note: When using "Save As", click on the arrow next to the file name to expand the locations you can save to. Choose "Drew Network" from the Favorites list, and then navigate to the desired folder.
Computer Not Provided by Drew
- MyFiles (myfiles.drew.edu)
- Connecting a Windows computer to Drew Network Drives on campus
- Connecting a Mac computer to Drew Network Drives on campus
The U: Drive
The U: drive is the campus shared drive. People are only able to access the folders here that they have been granted Trustee Rights to.To see what folders you have Trustee Rights to, you only need to look. Anything you see in the U: drive has folder(s) that either are public or which you, specifically, have been granted rights topermissions to see.
There are many types of Trustee Rightspermissions. You may have some or all of them for a given folder:
- S: Supervisor - all rights to a file. This right cannot be set here, but will be shown if set by an administrator tool.
- R: Read - the trustee can view the contents of files.
- W: Write - the trustee can write to an existing file.
- E: Erase - the trustee can erase a file.
- C: Create - the trustee can create a new file.
- M: Modify - the trustee can modify an existing file.
- F: File Scan - the trustee can see a file in a directory listing.
- A: Access Control - the trustee can add or remove trustees from the folder file.
To grant Trustee Rights to other users
- Read - Permits viewing and listing of files and subfolders
- Write - Permits adding of files and subfolders
- Read & execute - Permits viewing and listing of files and subfolders as well as executing of files; inherited by files and folders
- List folder contents - Permits viewing and listing of files and subfolders as well as executing of files; inherited by folders only
- Modify - Permits reading and writing of files and subfolders; allows deletion of the folder
- Full Control - Permits reading, writing, changing, and deleting of files and subfolders
| Excerpt | ||
|---|---|---|
To grant other users permissions to your folders
|
...
|
...
|
...
The U: drive can be accessed the same way as the F: drive.
|
The Employee Network Drives (G, O, and P)
The G: drive is the departmental drive and connects to one folder on either the O: drive or the P: drive, depending on the user. Students do not generally have access to any of these drives.
The O: drive is the administrative department drive. If you have access, you will see only the folders and files which you have been given permissions for.
The P: drive is the academic department drive. Academic projects and files should be stored here.
Students do not generally have access to these drives.
These drives are accessed the same way as the F: drive.
...
, and user permissions are granted following the steps under "To grant other users permissions to your folders", above.
Course Drives (K, T, and R)
The K: drive is a way for faculty to distribute files to students without using Moodle.
It can be accessed the same way as the F: drive.
.
The names of K: drive folders have been changed to include new Banner term codes at the beginning and CRNs at the end. For example: 201610-ANTH-103-A-10011.
ANTH = department
103 = course number
A = section number
10011 = CRN
2016 = Fiscal year
40 = term code Summer
30 = term code Spring
20 = term code Jan
10 = term code Fall
...
The T: drive contains one folder for each semester you've been at Drew. Inside is what the K: drive showed you during that semester. This archive allows you to find course specific information from earlier in your time at Drew.
It can be accessed the same way as the F: drive.
The M: Drive
The M: drive holds campus applications (programs). You should only access these files through the ZenWorks Application Explorer unless University Technology directs you otherwise. Students do not generally have access to this drive. It can be accessed the same way as the F: drive.
...
**Please note: Summer courses will access their current course folders via the T: drive, rather than through the K: drive. Students and faculty will find their folders in, for example, "T:\2018 Summer Terms".
The R: drive is the “old attic,” a legacy drive that contains an older system of network software and communication processes. You will generally not need to use this drive and students generally do not have access to it. If needed,
it .
Previous course folders going back to Fall 2009 are available on the Drew Network T: Drive (COURSES (\\CAUSEWAY2_T)), and earlier semesters dating back to Fall 2002 can be found on the R: Drive (OLDATTIC (\\CAUSEWAY2_R)).
These drives can be accessed the same way as the F: drive.
Students registered for courses are automatically granted access to the appropriate course folders, which can be found within the relevant semester folder.
The M: Drive
The M: drive holds campus applications (programs). You should only access these files if University Technology directs you to do so.
It can be accessed the same way as the F: drive.
...
On a PC, the C: drive is a representation of your computer’s hard drive and is where files and programs are saved by default. As long as you have your computer with you, the C: drive is available.
The I: Drive
Related Pages
| Children Display |
|---|
Please Share!
You can direct others to http://tinyurl.com/MyNetworkDrives so they can also access this information!
Reviewed 5/31/23On a laptop PC issued by Drew University, there is also an I: drive, a partition of the C: drive. If you save a file (but not a program) on these laptops, it will go to the I: drive by default. Because of this, if the C: drive becomes corrupt and must be reimaged, files saved in the I: drive can sometimes be maintained. If the hard drive itself is damaged, the files cannot always be recovered from either the C: or the I: drives. As long as you have your computer with you, the I: drive is available.