...
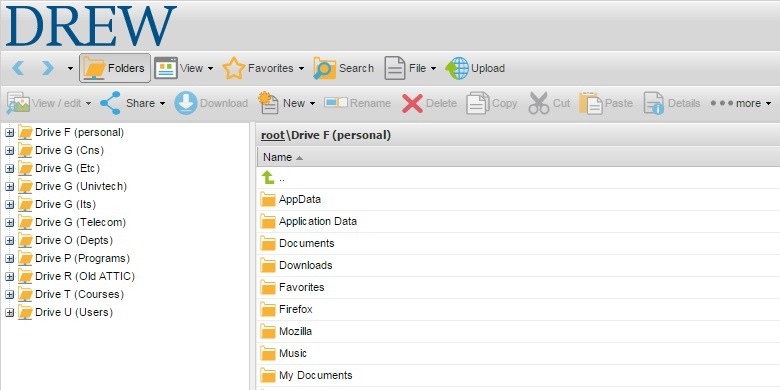
MyFiles is a secure service created for the purpose of allowing off-campus users access to their network drives when not on campus (or when working on a computer on campus that is not logged into the network). To use MyFiles, you must have an active Drew uLogin account, a connection to the internet and a web browser. MyFiles provides users with the ability to download, upload, and delete files from their network drives (F:, G:, K:, P:, and U:).
Using MyFiles
Logging
...
into (and out of)
...
MyFiles
| Expand |
|---|
You can use any browser to access MyFiles (Chrome, Firefox, Internet Explorer, Safari, etc). TreeHouse
|
...
|
...
|
...
myfiles.drew.edu |
...
...
|
...
After logging in, you will a screen like that displayed below.
|
Accessing Network Drives
| Expand |
|---|
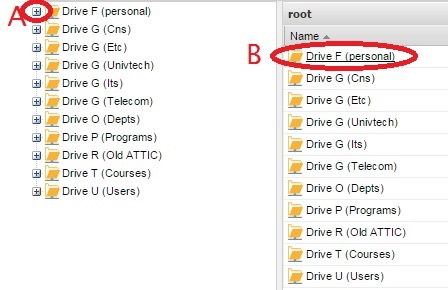
To access a particular drive/folder, click on the plus sign next to the name of the drive/folder in the column on the left (A) or single click on the name of the drive/folder in the main part of the window (B). A list of all the folders and files contained within that drive/folder will now be displayed on your screen. |
...
| Expand |
|---|
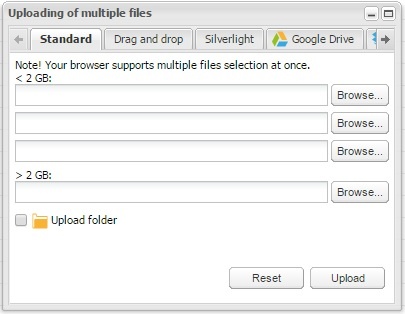
1. To upload a file you have saved on your computer (to save it to your network drive), browse (in MyFiles) to the folder where you want to save the file. 2. Click on the Upload button along the top.
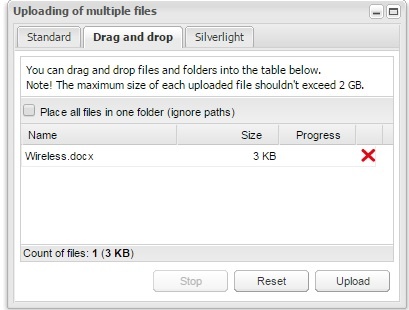
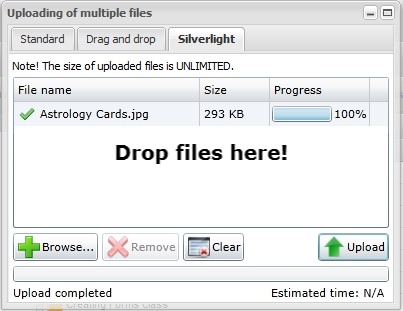
3. You have a few options for uploading files. A. On the Standard tab, you can select Browse and navigate to the folder on your local computer with the file(s) you wish to upload. To select more than one file, use the Shift or Control keys on a Windows computer, Shift or Command keys on a Mac, and click Open. The name of your file(s) will be displayed to the left of the Browse button. Click the Upload button. Please note that the maximum upload size for the first 3 fields is 2 GB. Use the final field, labeled "> 2 GB" to upload a larger file. B. On the Drag and drop tab, you can use the standard method of selecting dragging a file (or multiple files) from your local computer to the empty white space. You may find it easier to make your browser window smaller to facilitate seeing both your desktop/explorer/finder window and the Drag and drop MyFiles window. When you have the file(s) you desire, click the Upload button. Please note: Each file cannot exceed 2 GB in size. C. Another option is the Silverlight uploader. There is no file size limit when using the Silverlight uploader (but remember that you do have a quota on your personal drive's capacity). You have the choice to drag and drop or to Browse for the file(s). Click the Upload button when you are ready. Please note: You may have Silverlight blocked in your browser; if so, follow the appropriate steps to allow it to run.
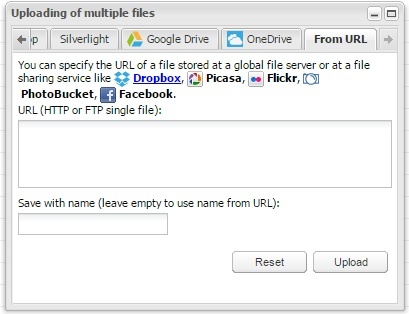
D. You can connect to various Cloud drives (Google Drive, OneDrive) using each of those tabs (you will probably need to scroll right) and authenticating. E. You can upload a file from a specific URL (web address) you have access to. Again, scroll right (arrow circled in red in the image below) and click the From URL tab. Paste the URL in the first box. You can choose to give the file a name in the second box. Click Upload. 4. When you are finished uploading files, click the minimize button ( |

...
| Expand |
|---|
1. Single click on the file to highlight it and select the Rename button (A). OR Right click on the file and select the Rename option from the menu (B). 2. Type the new file name. 3. Hit Enter on your keyboard. |

Linking to a file or folder
| Expand | ||
|---|---|---|
|


Creating a folder
| Expand |
|---|
1. Browse to where you want the new folder to be stored. 2. Click on New and choose Folder from the menu. 3. A window will pop up asking you to name your folder. Type in a name and click OK. |
...
Please log a support request or contact the Service Center at 973-408-4357 with any information you would like to share, and we will get back to you as promptly as we can.
One More Option: CloudPC
You can also work with network drive files from a "virtual computer" that behaves as though it is on campus using CloudPC. Learn more at Working With Network Drive Files in CloudPC.
Reviewed June 5, 2023