...
You can use any browser to access MyFiles (Chrome, Firefox, Internet Explorer, Safari, etc).
TreeHouse
myfiles.drew.edu
- Type https://myfiles.drew.edu in the URL address bar. Then press Enter.
- Log in with your Drew username and password.
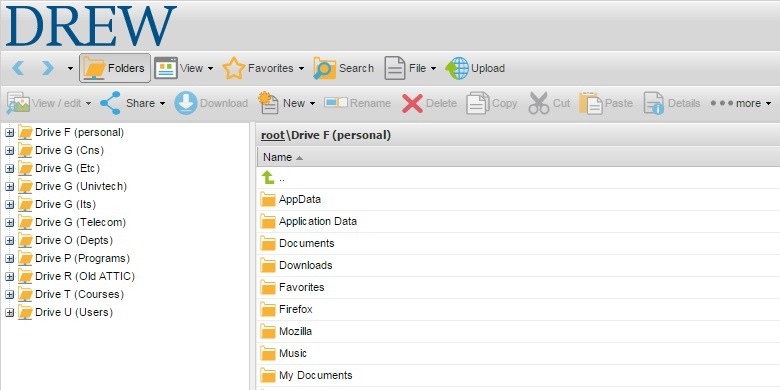
After logging in, you will a screen like that displayed below.
Accessing Network Drives
| Expand |
|---|
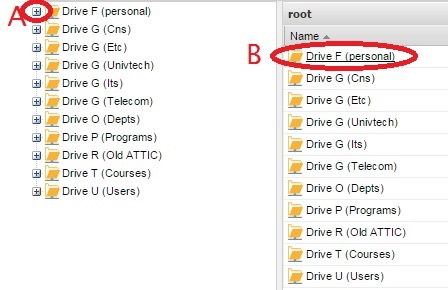
To access a particular drive/folder, click on the plus sign next to the name of the drive/folder in the column on the left (A) or single click on the name of the drive/folder in the main part of the window (B). A list of all the folders and files contained within that drive/folder will now be displayed on your screen. |
Downloading a file
| Expand |
|---|
1. Expand drive folders until you find the file to download. 2. Single click on the file to highlight it and select the Download button (A). OR Right click on the file and select the Download option from the menu (B). |

Uploading a File
| Expand |
|---|
1. To upload a file you have saved on your computer (to save it to your network drive), browse (in MyFiles) to the folder where you want to save the file. 2. Click on the Upload button along the top.
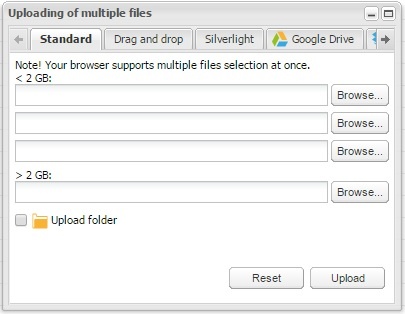
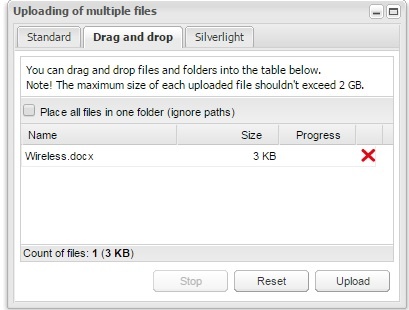
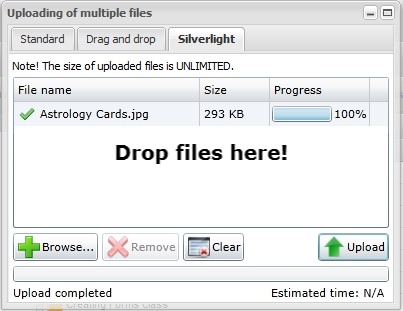
3. You have a few options for uploading files. A. On the Standard tab, you can select Browse and navigate to the folder on your local computer with the file(s) you wish to upload. To select more than one file, use the Shift or Control keys on a Windows computer, Shift or Command keys on a Mac, and click Open. The name of your file(s) will be displayed to the left of the Browse button. Click the Upload button. Please note that the maximum upload size for the first 3 fields is 2 GB. Use the final field, labeled "> 2 GB" to upload a larger file. B. On the Drag and drop tab, you can use the standard method of selecting a file (or multiple files) from your local computer to the empty white space. You may find it easier to make your browser window smaller to facilitate seeing both your desktop/explorer/finder window and the Drag and drop MyFiles window. When you have the file(s) you desire, click the Upload button. Please note: Each file cannot exceed 2 GB in size. C. Another option is the Silverlight uploader. There is no file size limit when using the Silverlight uploader (but remember that you do have a quota on your personal drive's capacity). You have the choice to drag and drop or to Browse for the file(s). Click the Upload button when you are ready. Please note: You may have Silverlight blocked in your browser; if so, follow the appropriate steps to allow it to run.
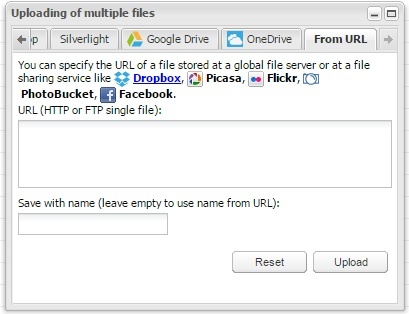
D. You can connect to various Cloud drives (Google Drive, OneDrive) using each of those tabs (you will probably need to scroll right) and authenticating. E. You can upload a file from a specific URL (web address) you have access to. Again, scroll right (arrow circled in red in the image below) and click the From URL tab. Paste the URL in the first box. You can choose to give the file a name in the second box. Click Upload. 4. When you are finished uploading files, click the minimize button ( |

...
| Expand |
|---|
1. Locate the file in MyFiles. 2. Single click on the file to highlight it and select the Delete button (A). OR Right click on the file and select the Delete option from the menu (B). You will be asked if you really want to delete the file. Choose Yes. |

...
Renaming a file
| Expand |
|---|
1. Single click on the file to highlight it and select the Rename button (A). OR Right click on the file and select the Rename option from the menu (B). 2. Type the new file name. 3. Hit Enter on your keyboard. |

Creating a folder
| Expand |
|---|
1. Browse to where you want the new folder to be stored. 2. Click on New and choose Folder from the menu. 3. A window will pop up asking you to name your folder. Type in a name and click OK. |
Deleting a folder
| Expand |
|---|
1. Right click on the folder name and select Delete from the menu. OR Single left click to the right of the folder name to highlight the folder (if you click on the name, the folder will open). Select the Delete button. 2. You will be asked if you really want to delete the folder. Choose Yes. |
Connecting to Cloud Storage with Google Drive
| Expand |
|---|
You have the option of connecting to an existing Google Drive or OneDrive account. Setting up these account links gives you the ability to quickly and easily copy files from one storage location to another.
|


Uploading from Multiple Google Drive Accounts
| Expand |
|---|
You can only be logged into one Google Drive account at a time. If you wish to connect to a different Google Drive account, please follow these steps:
|

Editing Cloud Storage Files
| Expand |
|---|
Once the file is copied to MyFiles, you will have the same view and edit options as other files on your network drives (and you - and anyone else with access to that network folder - will be able to access the files on your office computer). But please note: If you edit a file in MyFiles or via your network drive, the edits will not automatically appear in the file saved to your Cloud storage. You will need to copy the edited file back to the cloud storage. In the same way, edits made to a file via your Cloud Storage will not automatically update the file on your network drive; you will need to copy the edited file from the cloud storage location. |
Logging Out
| Expand |
|---|
Once you are done, click on the Log Out button at the top right of the screen (which looks like a person about to run out a door with your username to the right).
If you do not need to do anything else while logged in to your Drew account, you can use the "Sign Out Completely" button at the top of the TreeHouse screen. Otherwise, continue on with your work! |

...
Mobile Interface
| Expand |
|---|
Log in to your Drew uLogin account either via TreeHouse or myfiles.drew.edu (clicking the MyFiles link if you log in through TreeHouse).
You can tap outside the tips box to make it go away (or choose "Never show"). The view/edit options you have available to you will depend on what is installed on your device. |
...