...
Placemarks allow you to insert an icon that marks a location in the 3D viewer on Google Earth. 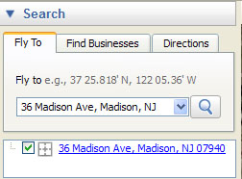
- Search for the location you want to mark in the Search box at the upper, left-hand corner of the screen.
- Use the Zoom slider to zoom in far enough to distinguish the place you want to mark from other, nearby locations.
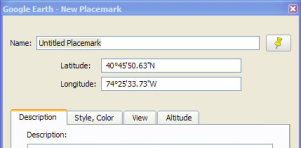
- Click on the Add Placemark icon
 at the top of the Google Earth screen. A New Placemark dialog box will appear:
...
Add Content to Placemarks
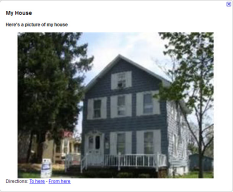
You can add interactive content to a Placemark by using HTML code. The interactive content will show up when you click on the Placemark in the 3D Viewer or when you click on the Placemark name in the Places layer.
...
- Click on the Add Path tool in the toolbar at the top of the screen.
 The Google Earth New Path dialog box will open.
 - Name the Path, but do not click OK.
- On the map screen, your cursor will become a square targeting Sight. When you click on the map with the Sight, a square Marker will appear.
...
- Clicking on a new area creates a new square Marker connected to the first marker with a line. These connected Markers create a Path.
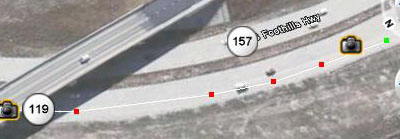
- Create a path by placing your first Marker at the Start point. The last Marker should be at the End point. It's important to create a Path from Start to End if you want to turn the Path into a Tour (see below).
- You can delete the last Marker you created by pressing the Delete key
- You can highlight an already existing marker by rolling over it until the Sight becomes a pointing hand icon. Click with the pointing hand on the Marker to highlight it.
- You can delete Markers by highlighting them and pressing the Delete key.
- You can move Markers by highlighting, clicking, and dragging them.
- Once you have created markers that extend from the Start location to the End location, click OK in the Google Earth - New Path dialog box. Your Path will automatically be saved in the Places menu.
- To Delete a Path, simply right-click on its title, and choose Delete from the pull-down menu. A dialog box will appear, asking if you are sure you want to delete the Tour. Click OK.
TIP: To create Paths that follow tight corners, as with sharp curves in a highway, zoom in and create a number of Markers close together to mimic the curve of the road (as above).
For more information on creating Paths, go to:
http://earth.google.com/userguide/v4/ug_drawing.html
Create a Tour from a Path
...
- Highlighting the Path you want to make into a Tour in the Places menu.
- Click on the Path button that appears at the bottom of the Places menu. The Tour of your Path will start to play in the 3D Navigation window, and the Play Tour menu will appear in the bottom, left-hand corner.
...
- As the Tour begins to play, click on the Save button at the far right of the Play Tour menu.
...
...
- Name the Tour and provide any additional information you like in the Description field.
...
- The Tour will automatically be saved in your Places menu.
For more information on Tours, go to:
http://earth.google.com/userguide/v4/ug_touringplaces.html
Create and Manage Folders for Places
...