...
Instructions for specific devices are below. You can click on the images to see them larger.
| Excerpt |
|---|
Before you beginThe Terms of Service for using Google Apps is only available on the web, so before you set the account up on a mobile device, you will need to access your Drew Google account on the web. You only need to do this once, so if you've already logged in to your Google Apps account, you do not need to repeat this step. 1. Sign into your Drew Google account on the web. The easiest way is to simply go to http://mail.drew.edu. 2. Be sure to accept the Google Terms of Service and complete the "CAPTCHA."  3. Proceed to the instructions for your device. | Note |
|---|
| Currently, users must explicitly enable IMAP before they are able to connect Mac Mail, Thunderbird, or another mail client to their account, or to set up their mobile device using the default Gmail settings. This must also be done from the web. Please visit https://support.google.com/mail/troubleshooter/1668960?hl=en#ts=1665018 to see how to enable IMAP. |
|
...
| Expand |
|---|
| title | Click here to expand for instructions... |
|---|
|
Android phones have native support for Google Services built in. To configure your Android device, follow the instructions at Google Support. You can have multiple Google accounts on your phone and it will show contacts and calendars for all of them (calendars from different accounts have different colors by default). Most other Google apps on the device allow you to switch which account is active or switch between accounts interactively. While different Different Android phones from different vendors may will look slightly different, here's different. Read the procedure for an Android 4.2 phone by clicking on the expand link below: 1. To - to the "Settings" app on your phone.
|
2. - Scroll down to "Accounts" and select "Add account":
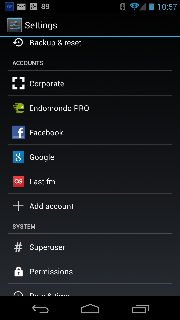 Image Modified Image Modified
|
3. - Select the "Google" option (you may see different types of accounts on your device).
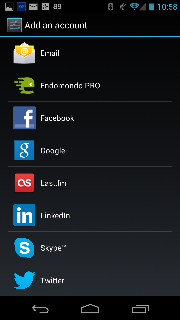 Image Modified Image Modified
|
4. - Select "Existing".
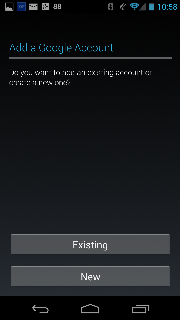 Image Modified Image Modified
|
5.
-- Double check that your email address ends in "@drew.edu"
-- Google will point out that you are agreeing to the Google Terms of Service, Privacy Policy, and Google Play Terms of Service. They also give you the option to be kept up to date with news and offers from Google Play. If you do not want these emails, be sure to uncheck the box before touching OK.
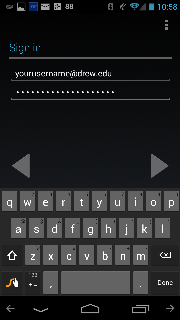 Image Modified Image Modified
|
6. - If you see the following screen, click "Download" and follow the instructions under "Google Apps Device Policy" below.
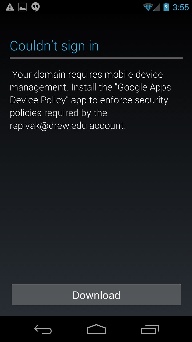 Image Modified Image Modified
|
7. - You may receive a screen offering to configure Google Play Store or "Set up payment info". You can select "Not now" here.
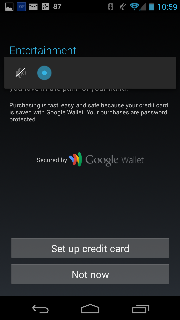 Image Modified Image Modified
|
8. - You may receive a screen offering to set you up with Google+. You can select "Not now" here.
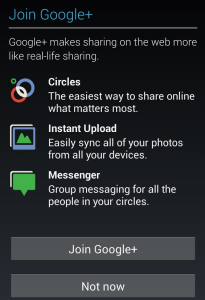 Image Modified Image Modified
|
9. Your - Your phone will work for a moment, and if successful will show what information is configured to sync to your phone.
-- If you do not want all of these things to sync, you can remove the check from the appropriate boxes. Please be careful if choosing to remove sync for some of these.
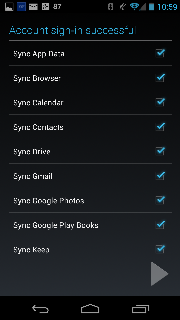 Image Modified Image Modified
|
Read the procedure for an Android 5.0 phone by clicking on the expand link below: | Expand |
|---|
- Go to the "Settings" app on your phone. Select "Accounts".
- Select "Add account".
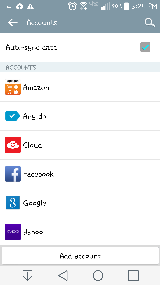 Image Added Image Added - Select the "Google" option (you may see different types of accounts on your device).
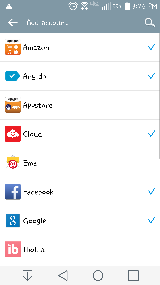 Image Added Image Added - Enter your Drew email address. Touch Next.
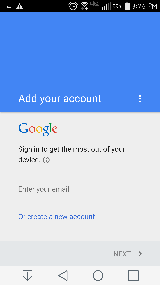 Image Added Image Added - Touch Accept.
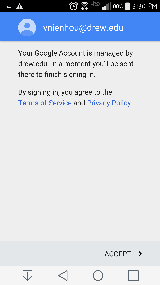 Image Added Image Added - Log in to the uLogin screen with your Drew username and password. Those enrolled in Duo should use their regular password, but will need to approve their log in as they normally do.
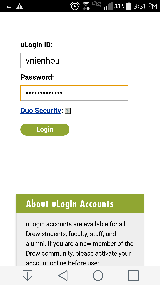 Image Added Image Added - You should be prompted to download the "Google Apps Device Policy". Follow the instructions below.
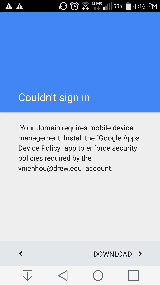 Image Added Image Added - After installing and setting up the Google Apps Device Policy, return to the Settings app. You may be prompted to set up payment info. Choose "Remind me later" and touch Next. It will probably take some time for your phone to sync the various types of data.
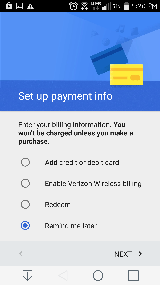 Image Added Image Added - You should be returned to your home screen. If you wish to adjust what data you sync, go to Settings and choose Accounts, then Google, then your Drew account. Remove the check from the boxes of the data you do not want to sync. Please be careful when choosing to turn off sync.
|
|
Google Apps Device Policy
...