You've decided to write an honors thesis or dissertation. Congratulations!
Many people are intimidated by the process of writing, editing, and defending a long paper. We in University Technology are here to make the formatting part of the process as stress-free as possible!
You will find links to documentation we find useful below, as well as a few suggestions. Please contact the University Technology Service Center at 973-408-4357 with additional questions, or to schedule an appointment with the Student Lab for more assistance.
Backing Up Documents
The most important habit of all is backing up your thesis or dissertation as you write.
Back up your files in multiple places. This means storing a copy on the hard drive of your computer, on your Drew Network F: drive, on a "cloud" drive, and on an external piece of hardware such as a USB Flash drive or external hard drive. When you have saved changes to your thesis, save the changed document to all of the backup locations with the same name. It is extra work to create the backups, but it will save you a great deal of time should one file get lost or corrupted!
Directions for accessing the F: Drive
Directions for using Google Drive
A non-Drew method for backing up your documents and accessing them anywhere is the website Dropbox. Dropbox is a free service that lets you bring your photos, documents, and videos anywhere and share them easily. This is done by syncing work to the site's cloud drive allowing for easy access across multiple devices (mobile, web, and desktop).
Starting to Write
Outlined below are instructions for formatting your document. If you would prefer to use a template with many of these formatting styles programmed and ready to use, please see Drew Dissertation Templates and Using Microsoft Word Templates.
- It is important to know that you must start working from this template before typing any text.
- When you open a template, it will be blank. You will be providing the text!
Specific Formatting Challenges
Please bear with us during "construction".
The following formatting instructions identify specific requirements for papers submitted for the Drew DMIN program. Please consult your advisor for the specific formatting requirements that apply to your paper and adjust the directions where needed.
These instructions are also written using Word 2013. If you use a different version of Word - especially Word 2011 for Mac - your options may be found in a different place, though they will go by the same name. Visit support.office.com to learn more about any setting you cannot find.
Paragraph Marks
Paragraph marks can be helpful to see when something is not responding to formatting the way you expect it to. These can be turned on and off by clicking the paragraph marks symbol,  , in the Paragraph group on the Home tab of the ribbon.
Text
Your entire document has the same font, so apply these settings before you write.
| Your text should be set to Times New Roman, size 12. | 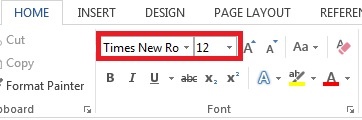 |
| Spacing should be double (2.0). | 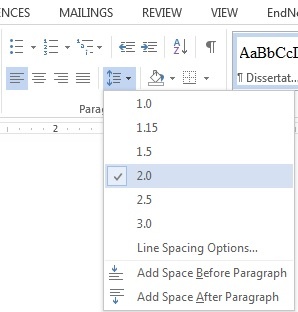 |
Page Margins
Your entire document should have the same page margins, so set the page margins before you write.
| Go to Page Layout > Margins > Custom margins…. |  |
| Set the margins as follows: 1” margins top, bottom, right; 1.5” left | 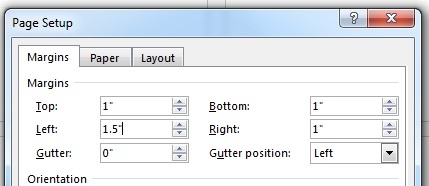 |
Title Page
Click the Center alignment button in the Paragraph group on the Home tab of the ribbon (
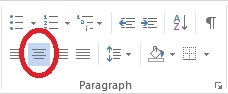 ).
).Type out your title, entirely caps (use Caps Lock)
Type the other information, matching the sample provided to you (not all caps)
Right click on first line of title
Choose "Paragraph…." from the menu
Make sure "Special" is set to "(none)".
Set "Line spacing, Before" to 108 pt. (This creates a 2.5” space at the top of the page)
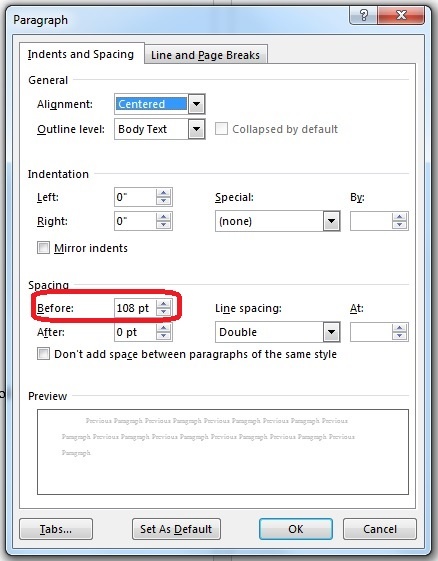
Click OK.
Add blank space between each section of text by hitting Enter until your date is at the bottom
- Hit Delete or Backspace once if the date goes on to the next page
Body Paragraphs
Type out your first sentence (even if you plan to change it later!)
Right click on the sentence and select "Paragraph…." from the menu.
Set "Special" to "First Line"
It should default to 0.5”, but set it to that if not
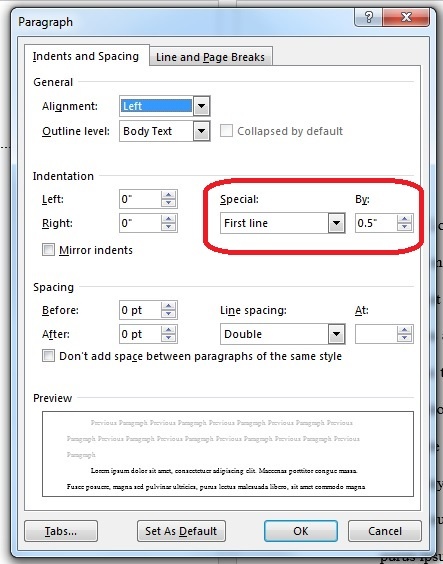
- Click OK
Chapter Titles
Chapter titles should be in all caps, centered
If naming chapters "CHAPTER 1: CHAPTER TITLE", type CHAPTER 1, hit Enter, then type CHAPTER TITLE
2” from top of page: Right click on (first line of) chapter title and select "Paragraph…." from the menu
"Special" should be set to "(none)"
Spacing > "Before:" should be set to 72 pt (to begin the title 2" from the top of the page)
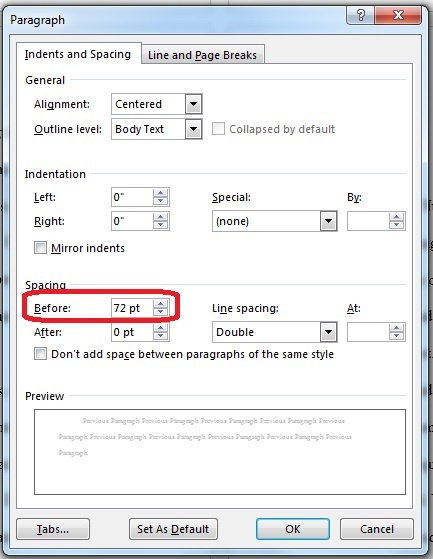
If it doesn’t look like your title moved, turn on paragraph marks and make sure there is a section break at the end of the chapter before
Adding Section Breaks (for page numbering and footnotes)
Create sections to handle page numbering and restarting footnote numbers at 1 in each chapter.
- The title page and any un-numbered pages in the front matter should be a section
- The Table of Contents and any numbered pages in the front matter should be a section
- Each chapter should be its own section
- Each appendix, if you have any, should be its own section
- The Bibliography should be its own section
To add a section break:
Put your cursor at the end of the first section (for example, after your abstract)
On the Page Layout tab, select Breaks > Next Page (under Section Breaks)
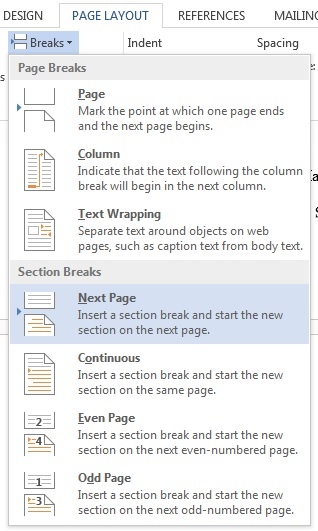
If you get an extra line before the next page’s title, hit (forward) Delete
- Word will remember the formatting you create in a section for page numbers and footnotes, so you can set up the formatting for the first few sections, then add sections for additional chapters as you write without needing to manually adjust the page number and footnote settings in each chapter
Footnotes
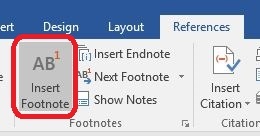
To insert, put cursor where footnote number should be
On the References tab, choose "Insert Footnote"
Formatting your footnotes:
Right click in footnote text and select "Paragraph…." from the menu
Adjust the following settings:
Alighnment: Left
Indentation, Left and Right: 0”
Indentation, Special: First Line, 0.5”
Spacing, Before: 0 pt
Spacing, After: 12 pt
Line spacing: Single
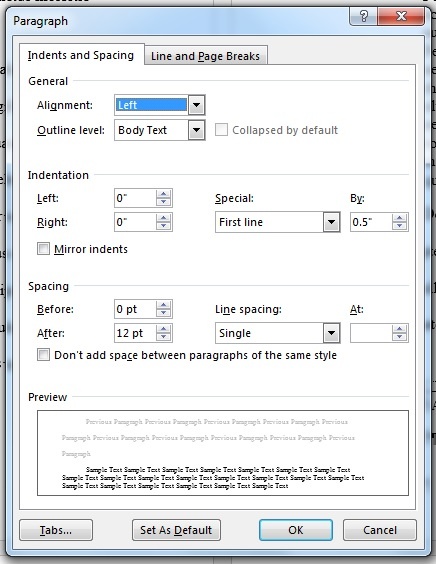
Click OK
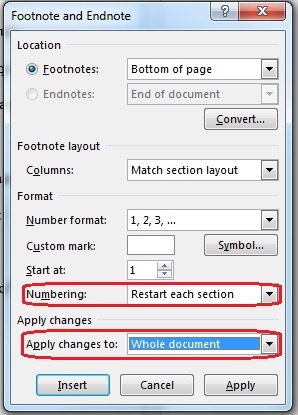
To restart footnote numbers for each chapter:
Right click on a footnote and select “Note options”
In Numbering, select “Restart each section”
In Apply changes to, select “Whole Document”
- Click Apply.
Page Numbering
Table of Contents
Page Numbering
Word has built-in functionality that allows you to create a "different first page", so that you can have a page number bottom center on the first page and top right on the following pages.
Having a different first page in each chapter can be done either by saving different files for each chapter, or by using section breaks. Please contact the University Technology Service Center at 973-408-4357 with any questions about these options.
Microsoft provides the following information on page numbers:
- Word 2007: Start page numbering on page 2 http://office.microsoft.com/en-us/word-help/start-page-numbering-on-page-2-HP001227657.aspx?CTT=1
- Word 2010: http://office.microsoft.com/en-us/word-help/add-or-remove-headers-footers-and-page-numbers-HA010372690.aspx?CTT=1
- If you use different sections in a single document, this page may be useful: http://office.microsoft.com/en-us/word-help/number-pages-differently-in-different-sections-HA101832542.aspx?CTT=1
- Word 2011: http://office.microsoft.com/en-us/mac-word-help/add-or-remove-page-numbers-HA102928583.aspx?CTT=1
- Word 2013: http://office.microsoft.com/en-us/word-help/add-page-numbers-HA102809692.aspx?CTT=1
Table of Contents
Word has a feature which will use heading styles from your document to automatically create a Table of Contents.
The instructions below are written assuming you are using one of our dissertation templates. We recommend you use the Chapter Title style for each chapter, to ensure proper formatting. You can then tell Word to look for that style when identifying what should be included in your Table of Contents.
- Place your cursor where you would like your Table of Contents to appear
- Click on the References tab
- Click Table of Contents
- Click Insert Table of Contents... (near the bottom of the menu)
- Click the Options... button
- In the list of Available Styles, find Chapter Title and type a 1 in the box to the right (under TOC level)
- Click OK
- Click OK again
If you are not using our templates, but are using Heading styles to mark your chapter titles, you can refer to the following information from Microsoft Office support to generate a Table of Contents.
Self-paced courses:
- Word 2007: http://office.microsoft.com/en-us/word-help/table-of-contents-i-create-an-automatic-toc-RZ010261698.aspx?CTT=1
- Word 2010: http://office.microsoft.com/en-us/word-help/create-and-customize-a-table-of-contents-RZ102634105.aspx?CTT=1
- Word 2013: http://office.microsoft.com/en-us/word-help/video-introduction-to-tables-of-contents-VA104034697.aspx?CTT=5
Articles:
- Word 2007: http://office.microsoft.com/en-us/word-help/create-a-table-of-contents-or-update-a-table-of-contents-HP001225372.aspx?CTT=1
- Word 2010: http://office.microsoft.com/en-us/word-help/create-a-table-of-contents-or-update-a-table-of-contents-HP010368778.aspx?CTT=1
- Word 2011: http://office.microsoft.com/en-us/mac-word-help/create-or-edit-a-table-of-contents-HA102929533.aspx?CTT=1
- Word 2013: http://office.microsoft.com/en-us/word-help/format-or-customize-a-table-of-contents-HA102809789.aspx?CTT=1
Footnotes
You can watch videos or download entire courses about working with footnotes in Word here:
- Word 2010: http://office.microsoft.com/en-us/word-help/video-footnote-and-endnote-numbering-VA102447796.aspx?CTT=1
- Word 2011: http://office.microsoft.com/en-us/mac-word-help/training-working-with-citations-sources-and-bibliographies-RZ103796348.aspx?CTT=5&origin=HA103525723
- Word 2013: http://office.microsoft.com/en-us/word-help/footnotes-in-word-2013-RZ104168662.aspx?CTT=1
Articles with instructions can be found at the following links:
- Word 2010: http://office.microsoft.com/en-us/word-help/insert-or-create-footnotes-and-endnotes-HA101854833.aspx?CTT=1
- These instructions also apply to Word 2007
- Word 2011: http://office.microsoft.com/en-us/mac-word-help/add-or-change-footnotes-or-endnotes-HA102929529.aspx?CTT=1
- Word 2013: http://office.microsoft.com/en-us/word-help/add-footnotes-and-endnotes-HA102809783.aspx?CTT=1
Section Breaks
If you are saving your entire thesis or dissertation as one document, you will need to use section or page breaks to allow you to format the first page of each chapter properly. Information about this feature can be found at the following links:
- Word 2007: http://office.microsoft.com/en-us/word-help/insert-a-section-break-HA010031073.aspx?CTT=1
- Word 2010: http://office.microsoft.com/en-us/word-help/insert-a-section-break-HA010368780.aspx?CTT=1
- Word 2011: http://office.microsoft.com/en-us/mac-word-help/insert-delete-or-change-a-section-break-HA102929536.aspx?CTT=1
- Word 2013: Page numbering with section breaks http://office.microsoft.com/en-us/word-help/start-page-numbering-later-in-your-document-HA102841427.aspx?CTT=1
Note: You will want to use "Next Page" section breaks between chapters.
You can follow the instructions at http://office.microsoft.com/en-us/word-help/number-pages-differently-in-different-sections-HA101832542.aspx?CTT=1 to number the pages for each section of the document. Remember to use the "different first page" option!
Bibliography
The following information may be helpful when you are ready to create your bibliography:
- Word 2007: http://office.microsoft.com/en-us/word-help/create-a-bibliography-HA010067492.aspx
- Word 2010: http://office.microsoft.com/en-us/word-help/create-a-bibliography-HA010368774.aspx?CTT=1
- Word 2011: http://office.microsoft.com/en-us/mac-word-help/add-or-change-sources-citations-and-bibliographies-HA102929528.aspx?CTT=1
- Word 2013: http://office.microsoft.com/en-us/word-help/create-a-bibliography-HA102809686.aspx?CTT=1
Using PDF-XChange Editor
PDF-XChange Editor is a software that allows you to work with PDF files. For your purposes here, you can use it to pull certain pages out of a larger PDF file to share with your adviser, or you can use it to merge multiple PDF files into one file for submission.
The program will work with files already saved as PDFs, as well as with image, .txt, or .rtf files. PDF-XChange Editor can be accessed via CloudPC (http://cloudpc.drew.edu). This is currently version 3. Staff or faculty on campus can also install the program on networked Windows computers. Read more at Installing PDF-XChange Editor (this page is only visible to employees logged in to their Drew accounts). Jump to: These features will work in version 8 of PDF-XChange Editor. If working in CloudPC, you will not currently have these options. Many people will create a form in a program like Word, then save it as a PDF and open it in PDF-XChange Editor to add the fields.Merging Existing Files into a Single PDF
Extracting Pages to a New PDF file
Creating an OCR PDF file
Creating a Fillable PDF Form

Miscellaneous Tips
- Use the template provided, with built-in styles
- Be cautious copying and pasting text in Word, even from one Word document to another
- Watch your white space: What you see as empty Word may see as information
- To start a new page, use the Insert>Blank Page option (or CTRL+ENTER on the keyboard) rather than simply hitting Enter until you reach the page you want
- Remember to save constantly as you work, and to save copies of the updated file(s) to all of your backup locations after each time of working on your document
- Don't worry about page numbers until you are mostly finished writing
- You can use PDF-XChange Editor, found in the Office Applications folder in CloudPC, to combine multiple PDF files into one PDF document (see "Using PDF-XChange Editor", above)
- If you feel more comfortable hiring someone to do the formatting for you, consider hiring a professional editor. A Google search for "professional editor" and your location should yield a few options.
Helpful Links and Pages
If you are having trouble with installation of the Endnote software, please call the UT Service Center at 973-408-4357 or bring your laptop to the UT Helpdesk in the Academic Commons.
If you are having trouble managing citations, please visit the Research Help Desk in the Academic Commons.
- Internet Searching - The Library has put together a page with links to information about using the internet to research.
- Thesis Formatting Guidelines.pdf
- This document includes a summary of formatting notes important to your paper, with references to the 8th Edition of A Manual for Writers of Research Papers, Theses, and Dissertations by Kate Turabian, as well as a sample title page and sample abstract page
- Library Lightning Round - An issue of the Library's "Library Graffiti" with a list of some of the best places to look for information.
- The Drew University Center for Writing Excellence is an excellent resource for those who have questions about the writing and editing process. Please visit their website for more information: https://www.drew.edu/writingstudies/writing-center
Submitting Your Completed Paper
You can submit your completed, approved paper at http://walter.drew.edu/etd/. You can find instructions on that page.