The New Gmail User Interface (July 2018)
As of April 25, 2018, Google started rolling out a new interface for Gmail.
As of July 2018, the new interface became available to our Drew University G Suite domain.
Here are some of the changes you will see:
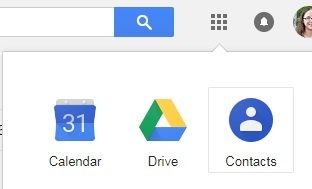
- Contacts
- To view your contacts, you now need to click on the Apps Grid and find Contacts in the list of Google Apps.
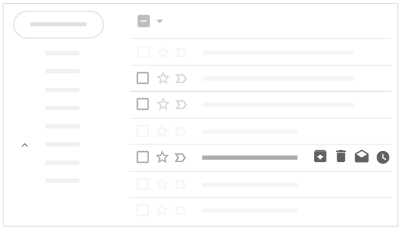
- Interact with emails directly from your inbox
- Without opening an email, you can choose to Archive, Delete, Mark as Read, or Snooze the message directly from the inbox.
- Snooze emails
- Snoozing an email will be familiar to Google Inbox users: You can hide a message from your inbox until a set date and time using the Snooze feature. Read more about Snoozing an email here.
- Please note: You have to have conversation view turned on in order to use the Snooze feature.
- Nudges
- Nudges are a new feature which will bring an email to the top of your inbox with a suggestion to reply (to an email you haven't responded to) or follow up (on an email you sent which hasn't received a response). Read more about turning off nudges here.
 *
*
- Calendar/Keep/Tasks Integration
- You can now view your calendar to the right of your inbox window by clicking on the small calendar icon to expand
To learn more about the options that are available - like snoozing an email, using Smart Reply, and viewing your Calendar or Tasks - we suggest this Help Center article or this video from Teacher's Tech. We also look forward to learning and sharing more about the new confidential mode and message expiration as those features are rolled out.
*Image from https://www.howtogeek.com/356781/the-8-best-features-in-the-new-gmail/
G Suite Learning Center
Google provides extensive documentation on using Gmail in the G Suite Learning Center.
Canned Responses
Canned responses are an advanced feature in Gmail that let you create and save email templates. These templates are usually used in situations where you find yourself sending the same information repeatedly.
Activate Canned Responses (Templates)
Please note: You cannot activate canned responses in an account you only have delegated access to. To follow these steps, you have to be logged directly into the account.
- In Gmail, click on the gear icon and choose Settings.
- Go to the Advanced tab.
- Click "Enable" next to "Canned Responses (Templates)".
- Scroll down and click Save Changes.
Create a Canned Response
Next, compose an email to use as a canned response template.
When you are ready to save it, click on the three dots in the bottom right of the compose window.
Choose Canned responses.
Choose "New canned response..." under "Save".

Name your canned response when prompted. Consider a name more easily distinguishable from any other templates you create than "Canned response".
Using a Canned Response
Open an email reply or a new compose window.
Click on the three dots in the bottom right of the compose window.
Choose Canned responses.
Choose your desired template from the list of available canned responses under "Insert".

Tip: To avoid having duplicate signatures in your emails, delete the signature from your canned response before saving it (or save it again!). This way, if your signature changes, the most up-to-date version will appear on your emails.
FAQ
Some of the specific questions we have been asked are listed and answered below.
- How do I send an email to a list of addresses in a spreadsheet?
To upload a spreadsheet of contacts, it needs to be saved as a .csv file. This means a "comma separated values" file as opposed to an Excel file. You can mark this when you go to "Save As" and use the drop-down box to change the type of file.
Next, go to Contacts (by clicking the arrow next to "Mail") and then there is a button with the word "More" on it. Clicking "More" will give you options including "Import." You can then choose the file.
For a step-by-step import tutorial straight from Google: https://support.google.com/contacts/answer/1069522 - How do I create a contact group?
Google's instructions can be found at: https://support.google.com/mail/answer/30970?hl=e
Note that the group will be created within the "My Contacts" section of your address book. When trying to add people to the group, you will probably want to search for the person and then use the Groups button drop down, shown below, to choose which group/s you want the person in.
- How do I access an account that was delegated to me?
To access delegated account please follow steps below:
1. Click on the image or initial icon at the top right corner of your screen
2. In the drop-down menu that appears, once the mailbox has been delegated you will see the mailbox listed with (delegated) after the email address. Click on the delegated account (note: If you have a lot of shared mailboxes, you may need to use the scrollbar on the right to view them all).
3. The shared/delegated account will open in a new tab or window. It will look just like another inbox but will NOT include:- Chat
- Calendar, Docs/Drive, Sites (calendars are delegated separately and will be accessed through My Calendars or Other Calendars in your Google Calendar view)
- Labs
- Access to account settings
- Themes
Note: Once you have been added as delegate it may take up to 24 hours for delegated account to appear below your primary account.